31 Dec 2017

Water Lilies Blanket Free Pattern

Evening!

So, as promised, today I'm going to share the instructions to make my Water Lilies blanket. 


If you can remember all the way back to this post, I fell in love with Scheepjes Secret Garden yarn.
It's one of their premium yarns and a slightly extravagant choice to make a blanket with but hey ho....in the words of that hair product advert...."because you're worth it" 😉

I settled on 3 main colours for my blanket.


From left to right: 709 Lily Pond, 703 Secluded Lake and 702 Herb Garden.

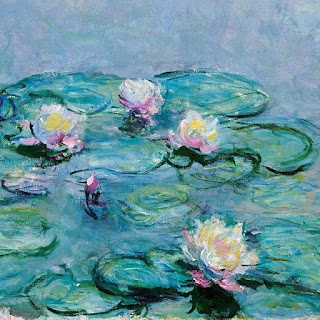
The colours reminded me of a version (one of many!) of Water Lilies by the artist Claude Monet....


And the name of the blanket was found!
The blanket is an easy make. Suitable for beginners and the more experienced hookers alike. For the latter, it's a good TV project!

Any enough chatter...let's get on with it!

INGREDIENTS 

To make a blanket 140cm x 110cm (blocked)

709 Lily Pond 7 x 50g balls (5 for the squares and 2 for joining and border)
703 Secluded Lake 6 x 50g balls
702 Herb Garden 6 x 50g balls
736 Bird Bath 1 x 50g ball (for border)

4mm crochet hook
5mm crochet hook
Needle for weaving in ends
Scissors
Blocking equipment

SQUARE PATTERN (UK TERMS)


Using a 4mm hook chain 4 and join with a slip stitch.

Round 1. Into chain circle just formed chain 3 (counts as first treble) treble 2 more stitches. Chain 2 to form the first corner. *Work 3 trebles into the circle and chain 2. Repeat from * 2 more times and join with a slip stitch in the 3rd chain of the first stitch (12 treble crochet and 4 2-ch spaces)

Round 2. Chain 3 (counts as first treble), work 2 trebles into the next 2 stitches and 2 more into the corner 2-ch space, chain 2 to form the corner and work another 2 treble into the corner 2-ch space. *Work 3 trebles into the next 3 stitches, (2tr, ch2, 2tr) in corner 2-ch space. Repeat from * 2 more times and join with a slip stitch to the third chain of first stitch. (28 treble crochet and 4 2-ch spaces)

Round 3. Chain 3 (counts as first treble), work 5 trebles into the next 5 stitches. Make the corner in the usual way (2tr, ch2, 2tr) *work 7 treble crochet into the next 7 stitches and (2tr, ch2, 2tr) in to the corner 2-ch space. Repeat from * 2 more times. Work 2 treble crochets into to the first 2 stitches and join with a slip stitch as before. Fasten off yarn and weave in ends. (44 treble crochet and 4 2-ch spaces)

You will need to make 221 square in total. I used 6 balls of both Secluded Lake and Herb Garden but only 5 of Lily Pond.

Block to 3 inch square. 

TOP TIP

Due to the nature of the yarn, there are variations in thickness. When you get to thinner bits work a little looser and vice versa. You may have to stretch some of the squares more than others. Don't panic! It'll all come good in the end!

JOINING

Ok, now you have made all of your squares it's time to join them together. 
I have 13 squares across and 17 squares down.


I laid the squares out to check that I was happy with the colour placement (I'm a Virgo.....I don't really do random!!!) I then took a quick snap with my phone for reference and then carefully made 17 piles of 13 squares ready to be joined. I also placed them in order. 

Obviously you can take a more relaxed and random approach!

Join with Lily Pond colour way using a 5mm hook. 
I have chosen a larger hook to join with as I'm using a zipper joining method. The larger hook size gives you a bit of give in the join. 

Esther from It's All In A Nutshell has made a fabulous video giving clear instructions about this joining method. (Just ignore the different squares, she made the videos for the Last Dance CAL)

You can find the tutorial HERE for Right handers and HERE for Left Handers 😊

I have joined my blanket in exactly the same method.

So now your squares are all joined we can now move onto the border.

BORDER

 Round 1. Using a 4mm hook and Lily Pond join the yarn into any BACK LOOP of the edge. Chain 3 (counts as first treble) and then work treble crochets into the back loops of stitches all the way round the blanket. The corners are made the same as before (2tr, ch2, 2tr) into the corner chain spaces. Once you have worked all the way round join as before and fasten off. 

Round 2. Using Bird Bath join in the first stitch of an edge. Ch1, double crochet in same stitch. *Chain 3, skip 2 stitches, double crochet in next stitch. Repeat from * to corner. (You may have to fudge this a little to ensure you finish at the corner with a dc, don't worry! It will look ok once we have worked the next round) Chain 3 at corner and double crochet in the first stitch of the next edge. Continue around the blanket and join with a slip stitch into the first double crochet. 

Round 3. Chain 1 and double crochet in the same stitch.  work *(2dc, ch3, 2dc) into the 3-ch space, double crochet in next stitch. Repeat from * all the way around the blanket (omitting the final dc at the end) and join with a slip stitch to the first dc.

Now you can block your border. 


It should look something like this!
A delicate frilly edge.


I'll leave you with another photo of the finished blanket. 
I do hope you can understand my instructions!

Til next time x

post signature

30 Dec 2017

Water Lilies Blanket Reveal!

Hi Folks!
Hope you've all had a wonderful Christmas and are gearing up to celebrate the start of a happy and healthy New Year 😊

I have been busy finishing my Water Lilies blanket....and maybe starting a couple of new projects!
Enjoying some quiet hooky time over the festive period.

Today I'm revealing the finished blanket and I will be sharing the pattern, instructions and yarn requirement details tomorrow. It's my final blog project for 2017 and I really hope that you like it as much as I do. I'm a little bit in love with this blanket.....I think it will become my sofa snuggle blanket for these dark and chilly winter nights.

If you remember from my last post, I was making lots and lots of three round solid granny squares with Scheepjes Secret Garden yarn. 
Once I had decided on the size of the finished blanket, I laid out all of the blocked squares on the rug and took a quick photo to remind me of the colour order....


The plan was to then join them in this order....only I managed to reverse it!!!!
This is what happens whilst supping gin and tonic!!!

I decided on a fairly simple, narrow border to give a bit of a frilly edge effect.
I think it looks great....but boy it took some blocking! I dread to think how many pins were used!
Anyway here we go......I give you my Water Lilies Blanket!


It was a REALLY bad light day here....forgive the picture quality haha


It's not a huge blanket, but more than ample for sofa snuggling!


I love the frilly edge 😍


It just frames the blanket perfectly.


I'll leave you with the obligatory crumpled blanked photo 😉
This is how the blanket is right now.....over my legs....it's bloody freezing here haha!

Til tomorrow x

post signature

11 Dec 2017

Water Lilies Blanket WIP Update

Hi folks!
Just thought I'd quickly pop in and share some WIP progress pics with you 😊
If you can remember back to this post, I decided to make a luxury blanket with Scheepjes Secret Garden and inspired by Claude Monet's Water Lilies painting (well one of many!)


I chose 3 colours for the blanket: 709 Lily Pond, 703 Secluded Lake and 702 Herb Garden


I felt that these 3 would give me the colour selection that I was aiming for. 


The blues....


the lilacs and purples....


and oh! those greens 😍


Mix them up a bit and you get a dreamy patchwork!


I'm really happy with how my Water Lilies blanket is coming along!
These aren't huge squares so there are a LOT to make! Thankfully it's a perfect TV project as the pattern is very simple. 
Ok I had better get back to blocking!
The blanket is nearing completion and I can't wait to show you the finished project....

Til next time x
post signature

9 Dec 2017

My Tribe

Hi Folks!
Thank you for joining me on this wonderful blog hop around the Scheepjes Bloggers!
Susan from Felted Button wrote a beautiful post yesterday and I'll be honest....I'm feeling more than a little pressure to produce something half a good!!!!
Normally I stick to talking about yarn and yarn related things on my blog. 
This time it's a little different. 
This time the yarn represents much more. 
It's all about My Tribe. 
Our Tribe. 
The Scheepjes Bloggers. 


Just over a year ago, whilst on a Scheepjes Bloggers weekend, we were all asked to choose a set of 6 colours that would drift together well. It was to be for a new yarn range to represent the bloggers.
Well! You can only imagine the frenzy of excitement that ensued! I can still remember it so well. I mean, it's not every day you get asked to choose colours that will be made into a ball of yarn named after you is it?!
What I also remember so well is a an overwhelming feeling of gratitude and happiness to be involved with such a fabulous set of people. I do confess to welling up a bit and going to the loo to have a quiet blub as it was all too much....but shhhh! Don't tell anyone 😉 
I think it's fair to say, as a collective, we are so much more than a group of yarn loving makers and designers. We get each other. We understand each other. We cry together when bad things happen. We support each other when the going gets tough and we laugh and celebrate when things are good. We come from all over the world and different walks of life but when we are together we are in our happy place. Safe in Our Tribe
Obviously it also helps that the yarn is freakin' stunning 😍


The Our Tribe yarn itself is a sport weight 70% Merino Superwash/30% polyamide blend. 
It comes in 100g balls which is 420 metres. It's machine washable (yay!) at 40 degrees and the recommended hook/needle size is 2.5 - 3mm.


I spent some happy time arranging the colours. I think you'll agree there is a lovely selection here!


This is the 50 Shades of 4ply colour way!
I've haven't had a great deal of time to play with the yarn as yet but I've hooked up a small selection of samples to try and show you the yarn in action. Ive used a 3mm hook and found that this size gave some great results.


This plain HDC sample shows the colour transitions. 


I tried out a more solid textural pattern and was pleasantly surprised with the results! 
The texture pops more than expected and it highlights the gentle colour changes beautifully.


I also really liked the yarn in a lacy pattern. 
One thing you cannot tell from the photographs is how well this yarn drapes once blocked. 
It is very soft. It passed the next to neck skin test with flying colours!
(yes I really do sit with yarn samples draped around my neck!!!)
I have plans for this yarn! Both crochet and knit wise so do please keep checking back.
Do pop over to the very talented Jellina from Jellina-Creations tomorrow for more Our Tribe love.
In fact just go now! You can browse a bit before tomorrow 😉
If you haven't been flowing this journey with us so far, here are the links to the previous posts:
Kirsten (Haak Maar Raak)
Nerissa (Miss Neriss)
Rachele (Cypress Textiles)
Susan (Felted Button)
Til next time x

post signature

3 Dec 2017

New Love.....

I've fallen in love......with my new yarn! 😉
Evening folks!
Having been in this hooky/yarny world for a bit, it's not very often that I find a yarn that literally makes me stop dead in my tracks. Well, today I'm sharing with you a yarn that has done just that!
It has, quite simply, stolen my heart! 💗

Secret Garden by Scheepjes isn't a new yarn (it was launched over a year ago) but it's fairly new to me. I was just waiting until I had some free time (a rarity!) before I could dream up a fitting project for such a luxurious yarn.

Let me tell you a little about this special beauty! 


It is available in 10 variegated colours....


.....and 8 solid colours. The solid colours have been carefully chosen to co-ordinate with the variegated palette, meaning you have a perfect contrast and you can mix and match with ease.

The yarn itself is a one of Scheepjes white label yarns. One of their premium lines! It's a silk blend single ply yarn that is available in 50g balls. This gives you 93 metres of heaven in a ball!
Because it's a silk blend, there is no throwing this baby in the washing machine. It needs a careful hand wash to ensure that the 20% silk, 20% cotton and 60% polyester blend remains in tip top condition. 


The variegated colours are a joy to behold! Lots of gentle colour changes and it is sooooo soft to touch!


It also comes with that very handy easy start tab!

So what to make???!!!!
What colours???....ooooooh decisions, decisions!

When I first saw the blues/greens/lilacs in this range, I was instantly reminded of Monet's Water Lilies.


I decided to choose colours based around this....


Three colour ways but within each ball lies lots and lots of different colours.


You can see the colours a bit better in this photo.


The colours are quite difficult to catch in a photo....especially in the bad light of winter!


It's going to be a very luxurious throw for my living room sofa.
A simple pattern to let the yarn do the talking.

I'll keep you updated on progress!
Til next time x

post signature

25 Nov 2017

Yoga Cushion Pattern

Hi Folks!
So today I'm sharing how to make the yoga cushion I revealed in the last post.


It's a simple stitch pattern that really makes the yarn sing!
Scheepjes Wanderlust yarn is single spun 100% acrylic yarn with a fairly slow colour change that allows for an effect where the colours merge into each other to give a pleasing striped finish. The width of your project will determine how wide the stripes appear. So the wider your project, the narrower your stripes will be. 

The ball size is 100g and for that you get 232 metres of yarn. It retails at around £3.99 per ball and is machine washable at 30 degrees.

It comes in a lovely range of colours...


For my Wanderlust journey I opted for the Hawaii colour way.....because I loved the colour palette and it also matched my yoga accessories nicely! 


When deciding on a stitch for this cushion I wanted one that not only showed the yarn to it's best but also had some texture. I made a fair few swatches with different stitches before I decided on this one. 

I loved the look of Apache Tears by Sarah London.....but wanted something a little less fussy. Then I stumbled upon a blanket made by Wink. I swatched to see how it would work without changing colour each row and it worked beautifully 😍 
Wink has produced a fabulous step by step guide to make this stitch so I'm not going to reinvent the wheel by posting another guide here today.....you find her instructions HERE. That link is for the English version. 
The Dutch version can be found HERE.

Ok on to the cushion instructions.....

Ingredients!
Scheepjes Wanderlust x 2 100g balls (if you are making a larger/different shaped cushion you may require more yarn)
4mm crochet hook
Scissors
Needle to weave in ends (sorry! there are a lot of ends!)
Cushion pad 12" x 20" (I got mine HERE)

How To!
Make 2 oblongs following the pattern instructions from the links above. 
You will chain 50 + 1 to give the required width for the cushion. If you are making a different sized cushion you will have to adjust the starting chain to fit. 
The pattern calls for multiples of 10 plus 1 for turning on the first row only. 
At the end of each worked row following this you will fasten off, turn your work and rejoin the yarn. Whilst you are working this pattern, the right side of the work will always be visible. 
You will end up with lots of ends to weave in! If you are like me and find this a tedious chore, I would suggest working around 10 rows and then stop and weave in those pesky ends!


I'm sure they breed!!!!

Continue until you have worked 84 rows. Fasten off. 
Now make the other cushion piece exactly the same. 
As the 2 cushions pieces are being stretched over a cushion pad I didn't block them.

To join, place the 2 oblongs wrong sides together. I used a simple double crochet join. I joined a short edge, then a long edge, then a short edge. I then squeezed the cushion pad in place and used some plastic safety pins/stitch markers a bit like this....


......to evenly pin the remaining sides together. It just makes it a bit easier and ensures that the sides are evenly joined. It can be a bit fiddly! Fasten off and weave in (MORE) ends!

I finished off my cushion with some tassels added to each corner. You can find instructions on tassel making HERE!
You now have a finished cushion!


I hope you like it 😊

Next time I'll show you the yarn I've chosen for my next project and share the inspiration behind the colour choices. 

Til then x

post signature

18 Nov 2017

One Finished Yoga Cushion!

Good evening!
As promised, today I'm showing you my finished yoga cushion.
In all honesty, this cushion was completed a little while ago and has been in use since!
It works perfectly....just enough height for me to perch comfortably 😉

I opted for a fairly well stuffed feather cushion pad so it would stand the test of time....in other words it would stand the weight of me on it without becoming as flat as a pancake!

So here we go....


I used Scheepjes Wanderlust in the Hawaii colour way.


The cushion used only 2 balls of yarn which makes it a very affordable project as it retails at £3.99 per 100g ball.


I added a tassel to each corner to give a bit of interest....well that and I seem to have a tassel thing going on at the minute 😉


The colours work beautifully with my well worn yoga mat!


I'll be showing you how you can make the cushion (or similar) in the next couple of days.
It's a simple but effective stitch pattern and you can alter it to fit whatever cushion size you need 😊
On that note I'm off to pour a well deserved gin and tonic... (it's been a busy day here!)

Til next time x

post signature
TEMPLATE DESIGNED BY PRETTYWILDTHINGS