Check out my ColourCrafter posts!
Showing posts with label ColourCrafter. Show all posts

25 Mar 2017

Dot - free blanket pattern and tutorial

Hello! Today I'm going to talk through the making of Dot step by step. It's a nice and easy pattern for beginners and experienced hookers alike. 
If you don't need step by step help, please feel free to skip to end where there's a written motif pattern for you 😊


It's made from Scheepjes Colour Crafter which is 100% premium acrylic and is available in 100g balls. A blanket designed to be easy care. My blanket is a cot sized blanket (34"x48") but you can easily make more squares to increase the size.
Ok let's get started!

Ingredients

Scheepjes Colour Crafter in the following colours:
Sint Niklaas x 2 balls
Malmedy x 1 ball
Den Helder x 1 ball
Bastogne x 1 ball
Terneuzen x 1 ball
Wilnis x 1 ball
Knokke x 1 ball
Charleroi x 1 ball
4mm crochet hook
Scissors
Darning needle to weave in ends
Blocking board and pins

How To

(We are working in UK English crochet terms)
Please bear in mind that I am left handed when looking at the photos 😉

Begin with your chosen coloured yarn. 


Make a magic circle (I always wrap my yarn around my fingers twice to make a secure circle)
Round 1. Working into the circle, chain 3 to make your first stitch and then work another treble crochet and chain 1. Next work 2 treble crochet stitches and chain 1, repeat this 6 more times so that you end up with 8 sets of 2 treble crochets separated by a chain stitch. 


Join with a slip stitch into the third chain of your first stitch. Now pull the tail of your magic circle tight. 


Round 2. Slip stitch into the next chain space to get you into the starting position for this round. Now we are going to make some treble clusters into the chain spaces made in the previous round. The first cluster is made slightly differently as we need to make the first stitch. Chain 2 to make the first stitch, yarn over hook and insert into the chain space, pull through 2 loops, repeat this twice more (you should have 4 loops on your hook) yarn over hook and pull through all 4 loops and chain 3. Yarn over hook and insert your hook into the next chain space, pull through 2 loops. Repeat this 3 times. You will have 5 loops on your hook (see photo above). Yarn over hook and pull through all 5 loops, chain 3. Repeat this 6 more times.


Join with a slip stitch to the first cluster.


Round 3. In this round we are going to make some puff stitches. A little fiddly but effective!
Slip stitch into the next 3 chain space. Yarn over hook, insert into the chain space and pull through, repeat 4 times so you will have 11 loops on your hook (as in photo above),  yarn over hook and pull through all 11 loops....this is the tricky bit!


It should like the photo above!


Now secure this by chaining 2. Work a double crochet into the top of the next cluster and chain 2. Make another puff stitch into the next chain space, chain 2 and double crochet into the top of the next cluster, chain 2. Repeat this for the rest of the round.


Join with a slip stitch.
Fasten off yarn. 
Don't worry if your circle curls up a bit at the edges, that will settle when we work the next round. 


Round 4. With the grey yarn, join in any 2 chain space. Chain 2 (counts as first half treble crochet) and work 2 more half treble crochets into the same chain space. Into the next 2 chain space work 3 half treble crochets. It should look something like the photo above. 


To  make the corner, into the next chain space work 1 half treble, 1 treble and 1 double treble, chain 1 and move onto the next chain space. Into that space work 1 double treble, 1 treble and 1 half treble. Your corner should look like the photo above!


So continue to work 3 half trebles into the next 2 sets of chain spaces and then make a corner as before. 


It should look like this! Fasten off and weave in the ends. 

So that's how you make the squares. 
For a cot sized blanket measuring approximately 34"x48" I made a total of 117 squares which when blocked measured 4" each. 
I made 17 squares in each of 5 colours and then 16 in the last 2 colours. 


Next step is to block your squares. I pinned mine to my blocking board and then gave them a good soaking with the spray gun!

Joining


Lay your squares in the order that want them to be joined. 
(Mine are unblocked for this tutorial!)


Next place right sides together and work a double crochet in the corner chain space. Chain 3 and work a double crochet in the space between the next set of 3 stitches. Repeat this to corner space. Instead of fastening of pick up your next pair of squares and repeat the process.


You should end up with a row of sets of squares joined like this although yours will be longer!
Continue joining your squares like this. So on the next row you will be adding 1 square at a time to the 2 already joined if that makes sense?


You'll end up with rows of horizontal joins. Joining by using this method cuts down on joining and fastening off and ultimately doesn't have so many ends to weave in which is always a bonus!!!


Once you have made all of your horizontal joins you can start on the vertical joins using the same method.


It should end up something like this on the reverse..... 


And this on the right side! I don't weave my ends in at this point as I find it much neater to weave them into the border stitches but it's entirely up to you. 

Border


I have opted for a very simple border of linen stitch. Using the grey yarn, start by joining into a corner chain space, work a double crochet, chain 3, double crochet into the corner space, chain 1 miss 1 stitch and double into the top of the next stitch. Continue along each edge in this pattern and work a double, chain 3 double into each corner space. Join with a slip stitch. You may have to fudge a little for the first round 😉
On the next round you are going to make your double crochets into the chain spaces and a double, chain 3 double crochet into the corner spaces. Work another round in the grey and finish by working the final round in one of the colours. Fasten off and weave in your ends. 

TADA!!! Your blanket is finished!


Motif Pattern

UK English terms.

Using one of the coloured yarns, make a magic circle.
Round 1. Ch3 (counts as first tr) tr into circle, ch1, *2tr, ch1. Rep from * 6 times. Join with slst in 3rd ch of 1st st. 
Round 2. Slst into ch-sp. Ch3, 3trcl, ch3, *4trcl, ch3, rep from * 7 times. Join with slst.
Round 3. Slst into next ch-sp. *Puff st in ch-sp , ch2, dc in top of cluster, ch2. Rep from * 7 times. Join with a slst. Fasten off yarn. 
Round 4.  Using grey yarn join into any ch-sp. Ch2 (counts as htr for this group of htr only) 2htr into ch-sp, 3htr into next ch-sp, (htr, tr, dtr) in next ch-sp, (dtr, tr, htr) in next ch-sp (corner made) Rep around motif. Join with slst. Fasten off yarn. 
Weave in ends and block to 4" square. 

Joining and border made as above. 

Hope you find my instructions useful. 
Enjoy!

Til next time x

post signature

19 Feb 2017

The Not Yet Named Blanket Reveal

Hi Folks! Ok so today I'm sharing (eventually) the reveal of my blanket with no name (formerly known as the Dotty Blanket lol)

Made from Scheepjes Colour Crafter, it's a snuggly and practical blanket. It needs to be in my house as my kitties like nothing more than a blanket to pad on....oh and occasionally puke on 😂
Because it's 100% premium acrylic I can throw it in the washing machine (40 degree wash)!

Anyways....enough waffle.....here it is!


I have to confess that I'm a little bit in love with this blanket 💙💚💙


I think you can even see the squishy, snuggly loveliness in this photo!


I added a very simple linen stitch border as I felt that was all it needed.


The reverse is quite neat and tidy too so no worries about the wrong side showing!


Amazingly, I managed to get kitty free photos! Although Ziggy was on the blanket as soon as my back was turned lol


Doesn't it look pretty with the sun shining through it? All stained glass window like!
I actually just took this photo as I couldn't quite believe that the sun was shining....it's been dark and grey here of late!

Ok so I hope you like the new blanket....any ideas on a name???!!!
I'm almost finished putting together a step by step tutorial for this blankie and of course a free pattern.
Taking photos at this time of year is VERY challenging!

Til next time x

post signature

30 Jan 2017

Dotty Blanket Progress

Evening!
Thought it was about time I shared my blanket progress with you all...
If you remember back to this post, I decided to make a smaller than usual blanket using Scheepjes Colour Crafter yarn. The idea being, that this could be an easy care blanket perfectly sized for throwing over knees on a winters day.
It would make a lovely baby blanket too!

I decided to use Colour Crafter as it's soft, snuggly, can be thrown in the washing machine and oh my lord!....the colour range is AMAZING! Over 90 colours to choose from 💙💚💛💜

100% premium acrylic without that nasty squeaky feeling.....100g = 300m and very affordable at £1.99 per ball. You can buy it HERE 😊

So onto the progress.....


If you remember.....I chose a mix of blues and greens with a lovely soft grey.


I ended up using 4 different blue shades and 3 of green


I designed a nice and simple motif and set up a production line!!!
Centres first and then a grey to frame the circle.


Then onto my trusty blocking board!


Next....onto the deciding where to place the colours and some joining! Oh I do love how these colours and this simple design is turning out 💗
Sometimes it's just all about the colours!

Speaking of which....another project is in the making. I'm a roll....catching up and loving being in my creative zone again.

Next time I'll share my colours and yarn for this new project.
Til then x

post signature

21 Dec 2016

New yarn = new project!!!

Oh don't you just love starting something new! I maybe like it a little too much....hence the pile of unfinished objects in my guest room 😉
Anyway, let's pretend they don't exist and my conscience is clear to start something new!
What yarn to use? What colours to choose? What design?
Ooooh! Decisions decisions!
I think a blanket. Yes a blanket. I've only made three so far this year 😂😂😂
A smaller blanket this time. A little bigger than a lapghan. More like a baby blanket size.
Ok now that's decided onto yarn and colours!
Yarn....something with a huge colour choice. Easy to care for and snuggly soft....
No contest really.....
SCHEEPJES COLOUR CRAFTER!!!!
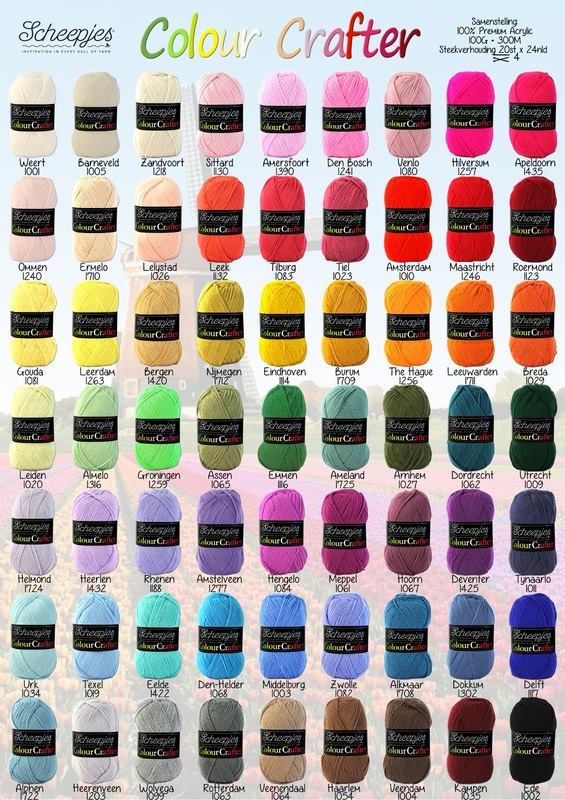
The perfect choice! Do you know it's available in over 90 colours??? Yes....more than 90!


Look at all those colours! How to choose....how to choose???!!!!
This premium acrylic yarn really is very different to other acrylics that I've worked with before. For a start there's no nasty squeak to this yarn. It really doesn't feel like 100% acrylic. It's unbelievably soft and washes and wears well. 100g balls give you 300 metres of yarn so making larger projects is very affordable. 


I decided to go with a combination of greens and blues with with lovely soft grey.


A nice colour combination! Next job is to decide on a design!
I'll update you on that in the coming days. Well that's if my laptop stays alive. We have laptop woes in this house at the moment. Poor thing is old and worn out (a bit like me!)

I've also got a pattern to share....I haven't forgotten. A trip to Holland and Christmas preps just got in the way! I *think* I'm on top of things now 😉

Til next time x

post signature

20 Nov 2016

Carnival Cushion Reveal!

Hi folks! As promised, this time I'm sharing the finally finished Carnival Cushion made with Scheepjes Velvet yarn.
This yarn is from the Colour Crafter family and gives the effect of worn velvet....truly delicious!
You can buy it from Wool Warehouse 😊

If you can cast your mind back to June and THIS post, I updated you on the progress of the cushion. It was inspired by the colours in a lovely hook that I picked up on holiday earlier in the year....


I just loved how those colours worked together!
I decided on a mitred square design using random colour stripes...


Contrasting with a plain square.


And then a simple stripe design for the back.


So! You wanna see the finished cushion???
Oh go on then.....


TADAAAH!!!!!!
I just 💖 the finished cushion.


A close up of the cushion front....check out that pompom edging!


And the back....a simple 3 button closure is all this cushion needed.


Ziggy couldn't resist getting in on the photo shoot which is typical because as I go near him with a camera he does a disappearing act!!!

I have written a free pattern to share with you all which will be posted very soon...
But next time I want to share something new! A blanket....or the new beginnings of a blanket!

Til next time x

post signature
TEMPLATE DESIGNED BY PRETTYWILDTHINGS