Check out my Crochet Wrap posts!
Showing posts with label Crochet Wrap. Show all posts

26 Apr 2017

Whirl Reveal

Hey!!!! I've got a reveal to share.....
Remember THIS POST where I talked about the new yarn from Scheepjes?
Well, as predicted, Whirl has got the yarn world in a spin!
Most stores can't keep it on their shelves!!!


Not surprising really when you see the colour combinations!


I was lucky enough to receive a sample to play with before the grand release date. 
Oh my....it did not disappoint!
It was a dream to work with 💜💜💜

If you remember, I decided to use THIS free pattern to whip up a wrap!


I think this is where I left it last time....


Finished but in need of a good blocking!


Check out the difference! Blocking really opened up the stitches and also gave it a heavenly drape. This is seriously gorgeous yarn!


The colours are a delight as are the colour changes! So sooooo gradual. 
Oh and not splitty at all!!!
I know there are other gradient yarns out there but my experience is of them being so splitty and not pleasant to use. Not Whirl....


I think I can definitely say that this yarn is now added to my favourites list!
Now I just need to try ALL of the flavours 😉

PS Rumour has it that THREE new flavours are about to be added!!!!

Til next time x

post signature

20 Feb 2017

Squeee.....have you seen what is coming???!!!!

Ok it's not very often I get this excited about a new yarn....but this time it's with due cause!
I'm sure you've heard me say this a million times...but I just LOVE colour change yarns. 
It's like some kind of magic enfolding in front of your eyes....
I'm waffling. I'll shut up and show you what I'm drooling over...


 I give you Whirl by Scheepjes. 
Isn't that just bloody gorgeous???!!!
And it gets better....have you seen all of the colours it will come in?


So what's so special about this yarn I hear you ask? There are gradient yarns already out there!
Ok well yes that's true. But do they come in 1000m cakes? Yup...1km of yarn!!!
Easily enough to make a shawl/scarf/wrap/other random project
Oh and the other pretty unique thing about this yarn is that it's NOT SPLITTY!!!!
Some gradient yarns are very splitty to work with. Splitty enough to make me swear and give up. 

Ok let me give you facts about this yarn....
It's a bend of 60% cotton and 40% acrylic so it will be lightweight and have lovely drape.
As I've said before it's got a generous twist to stop the spiltty factor occurring (YAY!)
Each cake weighs 215-225g and I would say it's a fingering weight. 
The recommended hook size is 3.5-4mm but you can alter that according to the finish you're after.
It will be available to buy from 6th March 😊

I was lucky enough to be sent a sample to play with....I KNOW!!!! 
*happy dances*


Lavenderlicious! I love it! It changes from grey through to deep deep purple 💜
If you look closely you can see how the oh so gentle colour changes happen....it's all in the ply 😉


And this is what the colours look like hooked up. 
I couldn't wait to get hooking and then couldn't put it down!
I can honestly say it's a complete dream to work with 💕💕💕

I chose this free Chevron Lace Wrap pattern by Tamara Kelly and used a 4.5mm hook to give a nice open finish. 


This is where I'm up to. It's finished but yet to be blocked. Even without blocking the drape is lovely so I'm expecting it to get softer again. 
I think this photo shows the colour gradient really well 💕
I'll get it blocked this week and, light permitting, take some photos to share very soon. 

Til next time x
post signature

23 Sept 2015

Summer Crochet Wrap Tutorial

Hello fellow hooky friends :-)
As promised, this time I'm going to try and talk you through making the Summer Crochet Wrap.
It's a join as you go (JAYGO) project. If you're comfortable doing this just skip the photos and head right down to the written pattern instructions.
If not, I'm going to try and explain with photos and text. If you get stuck, just add a comment and I'll try to help!
Ok lets get started...

I've made my wrap with the gorgeous Scheepjes Sunkissed yarn.
It's 100% cotton sport weight that seriously does not split. 
As with their Cotton 8 the more this yarn is handled the softer it gets!
It's machine washable and comes in 50g balls. 

THE DETAILS

The finished wrap measures approximately 22"x69.5" (56x178cm)
It weighs 385g and is made up of 114 motifs in total (6x19)

YOU WILL NEED


Sunkissed shade 3 x 150g
Sunkissed shade 6 x 150g
Sunkissed shade 7 x 150g

Crochet Hook  - recommended hook size is 3-3.5mm although I've used a size 4mm as I'm a tight hooker!
Scissors
Darning Needle to weave ends in
Blocking mat and stainless steel blocking pins

THE PATTERN

I've used this pattern. If you scroll down the linked page, you will find it.
Click on it and it takes you to the motif chart.
I won't publish the motif here as I don't want to infringe any copyright rules :-)
However at the end of the tutorial you will find that I've written out the pattern for all non chart readers.

TIPS!

My instructions and pattern are written in UK English crochet terms
Gauge is not really crucial for this wrap. What is more important is that your finished motif feels nice and soft. I suggest you work a motif in the recommended hook size and see what it feels like. If it feels stiff, try going up a hook size. Likewise, if it starts to resemble a string vest you might want to try a smaller hook! Sometimes it takes a few tries to find the right hook size.  
I am left handed! This means my rounds are worked in reverse to right handers and the same for joining. For those right handers out there.....just flip the joining directions. 
I would suggest weaving in your ends as you go, otherwise like me, you'll have way over a hundred to weave in at the end!!!
Ok. All set?

Chain 6 and join with a slip stitch in the first chain made.


Round 1. Chain 4 (this counts as 1 treble and a chain stitch), treble crochet into ring, chain 1. Repeat this 14 further times. Slip stitch into 3rd chain of first stitch. You will now have 16 treble crochets and 16 chain spaces. 


Round 2.  Slip stitch into next chain space. Now we are going to make some treble clusters! The first is slightly different to the rest. To make the first cluster chain 3 (this makes a treble) now yarn around hook, insert hook into chain space, yarn around hook and pull through (2 loops on hook), yarn around hook, insert hook into same chain space, yarn around hook and pull through 2 loops. You should now have 3 loops on your hook. Yarn around hook and pull through all 3 loops. Chain 3. The following clusters are made as follows: yarn around hook, insert into next chain space, yarn around hook and pull through 2 loops, repeat this 2 more times. You should have 4 loops on your hook. Yarn around hook and pull through all 4 loops. Chain 3. 
Repeat until you have worked clusters into all 16 chain spaces. Join with a slip stitch into the 3rd chain of first stitch. You should have 16 clusters and 16 chains of 3.


To get to the starting position for round 3, slip stitch into the next 2 stitches (marked below by arrows) and then slip stitch into a chain 3 space. 


Round 3.  Now we are going to make some corners and turn these circles into squares! * Double crochet into the 3 chain space, chain 5 and double crochet into the next 3 chain space. Repeat this once more. Into the next 3 chain space you need to make 5 treble crochets, chain 5 and then another 5 treble crochets. Repeat from * and finish by joining with a slip stitch into the first double crochet. 


First corner made!


Your finished motif will look something like this!

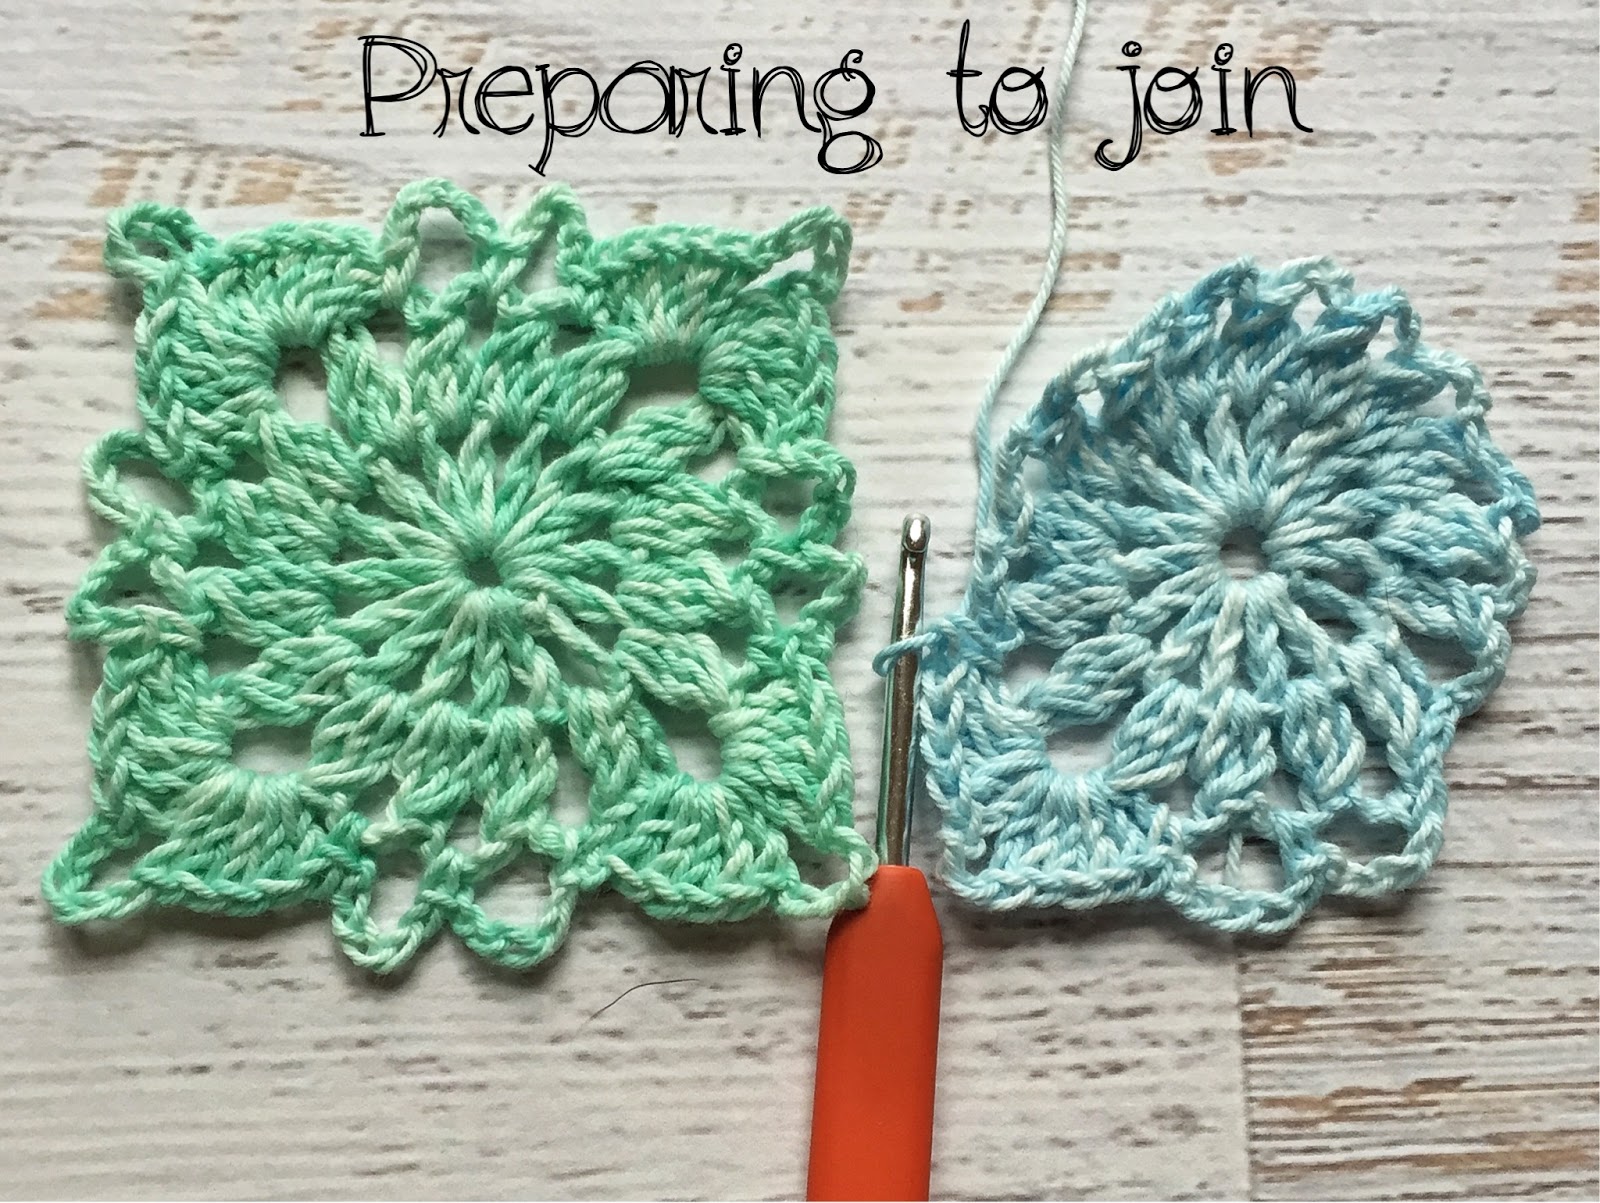
This join as you go wrap starts with one completed motif. The rest of the motifs are joined on round 3. 


 Work you next motif to round 3 then work the first 2 5-chains and a corner ending with a double crochet in the next chain-3 space. 


To join the motifs, chain 2 and then slip into the 5-chain space of the first motif. Chain a further 2 stitches and then double crochet into the next 3-chain space. Repeat this once more. Now you are ready to join the corners. Work your next 5 trebles into the next 3-chain space, chain 2 and slip stitch into the corner of the first motif. Chain a further 2 stitches and then 5 trebles into the same space. Double crochet in the next 3-chain space. Continue to work the rest of round 3. 


NOTE!

We are always going to leave the bottom corner not joined. This is because we'll be joining opposite corners on the next row.


Work along your first row of joins. My wrap is 6 motifs wide with 19 rows of motifs.

The first motif of the second row is joined at the top as marked. Please note that the corner is joined diagonally with the one to the top right. This is so that the joins are nice neat.


The second motif is joined as above. 


For the corner join you need to insert your hook UNDER the previously joined corner and into the corner chain space, yarn around hook, pull through both loops. You are effectively making a double crochet over the join. This is the neatest way I've seen of joining the corners. Continue to join as before. 


At the end of each row ensure that the top end corners are joined to the one above. 
Continue to join your motifs. On your very last row (YAY!!!!) make sure that the bottom edge motifs are all joined together.
Once you have finished your wrap it's time to block it! 

I have some kids play mats that I use to block larger items. I pin it out and then give it a good drenching with a spray gun. Alternatively you can soak it first and then pin it out. 

Because the yarn is made from cotton, it holds its shape beautifully once blocked and has a wonderful drape. Blocking is an onerous task but it really is worth it for the finished result!
Go on, grit your teeth and get blocking ;-)


WRITTEN INSTRUCTIONS
Abbreviations
st - stitch
ch - chain
sl st - slip stitch
ch sp - chain space
yrh - yarn round hook
tr - treble crochet
dc - double crochet
beg3trcl – ch3, yrh insert hook into ch sp, yrh and pull up loop, yrh insert hook into same ch sp, yrh and pull up loop,  [3 loops on hook], yrh and pull through 3 loops.
 3trcl – yrh insert hook into ch sp , yrh and pull up loop, yrh and insert into same ch sp, yrh and pull up loop, yrh and insert into same ch sp, yrh and pull up loop,  [4 loops on hook] yrh and pull through 4 loops.
Ch 6, join with sl st in first ch. 
Round 1. Ch 4 (counts as first Tr, ch 1).* Into circle (1 tr, ch 1) Rpt from * 14 further times. Join with a  sl st into 3rd ch of 1st st.
(16 tr, 16 1-ch)
Round 2. Sl st into next ch sp. Beg3trcl, ch 3. * (3trcl, ch-3) Rpt from * 14 times. Join with sl st into 3rd ch of 1st st. 
(16 3trcl, 16 3-ch)
Round 3. Sl st in next 2 st. Sl st into ch-3 space. * Dc, ch 5, dc in next 3-ch sp, ch 5, dc in next ch-3 sp,  to make corner - 5tr in next 3-ch sp, ch 5, 5tr in same ch sp. Rpt from * for rest of round. Join with a sl st in first dc.
I really do hope these instructions are clear!
Happy hooking everyone x
post signature

20 Sept 2015

Summer Crochet Wrap Reveal

Ok ok.....so I know that we are waving goodbye to Summer and welcoming Autumn but hey!....just think of it as a nice project for over the Winter months that'll be ready to go come Springtime ;-)

Actually I wear mine all of the time so maybe I should rename it to "Not Just for Summer Crochet Wrap"!!!!!

Ok without further ado......here is the finished wrap!


I'm completely in love with it :-)
Being made from cotton it is so soft and the drape is beautiful.

So just to remind you, I used Sunkissed yarn by Scheepjeswol in the following colours: 3,6 and 7.
It was a join as you go (JAYGO) project using this pattern motif.

Next time (Wednesday!!!) I will be talking you through the making of this wrap step by step.
So if you have never tried a JAYGO project before, why not join me?
I'll try to make it as simple as possible with lots and lots of photos ;-)
I have also have written the pattern out for those of you that struggle with reading crochet charts.

Ok I shall leave you with some more photos of the completed wrap.


It rolls up fantastically and can be used a scarf for the colder days


Or use a shawl pin to drape it gracefully


Or maybe just fling an end over your shoulder!!!!

Hope to see you next time
Til then.... x

post signature

5 Aug 2015

Progress Report - Summer Crochet Wrap!

Hi Folks!
Just a quick update on progress ;-)
If you remember, I started making a summer wrap with the beautiful Sunkissed yarn by Scheepjes.

On account of it being a join as you go (JAYGO) project, it was just perfect to pop into my hand luggage. This meant hooky on the train was possible and the wrap grew very quickly!


Lots of early morning hooky with a cup of tea!


And as usual.....lots of ends to weave in!
Did you spot THOSE SCISSORS???!!!!!
Oh my! I am in love with these scissors!


Aren't they beautiful?
And you know the best bit?
They are fabulously sharp and make the satisfying snip snip sound!!!


I've found a shop in Holland that I *think* ships abroad and accepts PayPal if you want to treat yourself ;-) You can visit the site HERE!
It's not very often that I rave about scissors but these are seriously good! They *almost* make the task of weaving in ends fun!!!

Ok so ends all woven in and onto the blocking board!!!


I can't stress enough how much blocking transforms your project! I used KnitPro blocking wires and T pins and some kids play mats that I picked up from Amazon to pin out my wrap as it was blocking. It didn't take long and the end result is worth it!

Join me at the weekend for the grand reveal ;-)
Til then x
post signature

26 Jul 2015

Summer Crochet Wrap Project!

In my defence, it's not exactly totally my fault for the lack of blog posts recently! 
I have a pretty elderly MacBook that simply just stopped working one day. I think the poor thing was exhausted and completely overloaded with way too many photos!!! (I'm pretty bad at deleting!)
So I decided to upgrade the memory. Well, it was much cheaper than a new MacBook!!!
I even managed to do the upgrade myself.....once I had a teeny tiny cross head screw driver.
I think I'm still in shock that it worked and my beloved lappy is working again :-)))

Anyway! I digress!
Those of you who follow me on Instagram will have seen my summer wrap project as it progressed.
It's a join as you go (jaygo) project that it very versatile as it can be used as a summer evening cover up or a lovely soft scarf. 

I wanted to do a complete idiots guide to join as you go. If only there had been a one available for me! Jaygo has been my nemesis!!! 

Ok so first off I chose some yarn. I wanted something that was pretty hardwearing but with a lovely drape. Cue the recently launched Sunkissed cotton yarn from Scheepjeswol.


I just love the gentle colour variations in this yarn. 


As you can see from the label, you can wash this yarn and it'll cope with an iron too!
And the best bit???? NON SPLITTY COTTON YARN!!!!


It comes in a delightful range of colours. Check them out on the Scheepjes website here!

For my project I opted for colours 3, 6 and 7.

You could even make this wrap in Scheepjes Cotton 8 but I challenge you to choose from the staggering amount of stunning colours!!!

Ok so now we've talked yarn choices, next was the task of finding a join as you go pattern that was fairly easy but still effective. I searched Pinterest and came up trumps! I found this simple motif (it's on the third row from the bottom!!!) and once I'd hooked up a sample I was happy :-)

So off I set making up the wrap. 


I was aiming for a random colour placement. It kinda worked!!!!
I shall update on progress next weekend ;-)
Til then x
post signature
TEMPLATE DESIGNED BY PRETTYWILDTHINGS