Check out my tutorial posts!
Showing posts with label tutorial. Show all posts

25 Mar 2017

Dot - free blanket pattern and tutorial

Hello! Today I'm going to talk through the making of Dot step by step. It's a nice and easy pattern for beginners and experienced hookers alike. 
If you don't need step by step help, please feel free to skip to end where there's a written motif pattern for you 😊


It's made from Scheepjes Colour Crafter which is 100% premium acrylic and is available in 100g balls. A blanket designed to be easy care. My blanket is a cot sized blanket (34"x48") but you can easily make more squares to increase the size.
Ok let's get started!

Ingredients

Scheepjes Colour Crafter in the following colours:
Sint Niklaas x 2 balls
Malmedy x 1 ball
Den Helder x 1 ball
Bastogne x 1 ball
Terneuzen x 1 ball
Wilnis x 1 ball
Knokke x 1 ball
Charleroi x 1 ball
4mm crochet hook
Scissors
Darning needle to weave in ends
Blocking board and pins

How To

(We are working in UK English crochet terms)
Please bear in mind that I am left handed when looking at the photos 😉

Begin with your chosen coloured yarn. 


Make a magic circle (I always wrap my yarn around my fingers twice to make a secure circle)
Round 1. Working into the circle, chain 3 to make your first stitch and then work another treble crochet and chain 1. Next work 2 treble crochet stitches and chain 1, repeat this 6 more times so that you end up with 8 sets of 2 treble crochets separated by a chain stitch. 


Join with a slip stitch into the third chain of your first stitch. Now pull the tail of your magic circle tight. 


Round 2. Slip stitch into the next chain space to get you into the starting position for this round. Now we are going to make some treble clusters into the chain spaces made in the previous round. The first cluster is made slightly differently as we need to make the first stitch. Chain 2 to make the first stitch, yarn over hook and insert into the chain space, pull through 2 loops, repeat this twice more (you should have 4 loops on your hook) yarn over hook and pull through all 4 loops and chain 3. Yarn over hook and insert your hook into the next chain space, pull through 2 loops. Repeat this 3 times. You will have 5 loops on your hook (see photo above). Yarn over hook and pull through all 5 loops, chain 3. Repeat this 6 more times.


Join with a slip stitch to the first cluster.


Round 3. In this round we are going to make some puff stitches. A little fiddly but effective!
Slip stitch into the next 3 chain space. Yarn over hook, insert into the chain space and pull through, repeat 4 times so you will have 11 loops on your hook (as in photo above),  yarn over hook and pull through all 11 loops....this is the tricky bit!


It should like the photo above!


Now secure this by chaining 2. Work a double crochet into the top of the next cluster and chain 2. Make another puff stitch into the next chain space, chain 2 and double crochet into the top of the next cluster, chain 2. Repeat this for the rest of the round.


Join with a slip stitch.
Fasten off yarn. 
Don't worry if your circle curls up a bit at the edges, that will settle when we work the next round. 


Round 4. With the grey yarn, join in any 2 chain space. Chain 2 (counts as first half treble crochet) and work 2 more half treble crochets into the same chain space. Into the next 2 chain space work 3 half treble crochets. It should look something like the photo above. 


To  make the corner, into the next chain space work 1 half treble, 1 treble and 1 double treble, chain 1 and move onto the next chain space. Into that space work 1 double treble, 1 treble and 1 half treble. Your corner should look like the photo above!


So continue to work 3 half trebles into the next 2 sets of chain spaces and then make a corner as before. 


It should look like this! Fasten off and weave in the ends. 

So that's how you make the squares. 
For a cot sized blanket measuring approximately 34"x48" I made a total of 117 squares which when blocked measured 4" each. 
I made 17 squares in each of 5 colours and then 16 in the last 2 colours. 


Next step is to block your squares. I pinned mine to my blocking board and then gave them a good soaking with the spray gun!

Joining


Lay your squares in the order that want them to be joined. 
(Mine are unblocked for this tutorial!)


Next place right sides together and work a double crochet in the corner chain space. Chain 3 and work a double crochet in the space between the next set of 3 stitches. Repeat this to corner space. Instead of fastening of pick up your next pair of squares and repeat the process.


You should end up with a row of sets of squares joined like this although yours will be longer!
Continue joining your squares like this. So on the next row you will be adding 1 square at a time to the 2 already joined if that makes sense?


You'll end up with rows of horizontal joins. Joining by using this method cuts down on joining and fastening off and ultimately doesn't have so many ends to weave in which is always a bonus!!!


Once you have made all of your horizontal joins you can start on the vertical joins using the same method.


It should end up something like this on the reverse..... 


And this on the right side! I don't weave my ends in at this point as I find it much neater to weave them into the border stitches but it's entirely up to you. 

Border


I have opted for a very simple border of linen stitch. Using the grey yarn, start by joining into a corner chain space, work a double crochet, chain 3, double crochet into the corner space, chain 1 miss 1 stitch and double into the top of the next stitch. Continue along each edge in this pattern and work a double, chain 3 double into each corner space. Join with a slip stitch. You may have to fudge a little for the first round 😉
On the next round you are going to make your double crochets into the chain spaces and a double, chain 3 double crochet into the corner spaces. Work another round in the grey and finish by working the final round in one of the colours. Fasten off and weave in your ends. 

TADA!!! Your blanket is finished!


Motif Pattern

UK English terms.

Using one of the coloured yarns, make a magic circle.
Round 1. Ch3 (counts as first tr) tr into circle, ch1, *2tr, ch1. Rep from * 6 times. Join with slst in 3rd ch of 1st st. 
Round 2. Slst into ch-sp. Ch3, 3trcl, ch3, *4trcl, ch3, rep from * 7 times. Join with slst.
Round 3. Slst into next ch-sp. *Puff st in ch-sp , ch2, dc in top of cluster, ch2. Rep from * 7 times. Join with a slst. Fasten off yarn. 
Round 4.  Using grey yarn join into any ch-sp. Ch2 (counts as htr for this group of htr only) 2htr into ch-sp, 3htr into next ch-sp, (htr, tr, dtr) in next ch-sp, (dtr, tr, htr) in next ch-sp (corner made) Rep around motif. Join with slst. Fasten off yarn. 
Weave in ends and block to 4" square. 

Joining and border made as above. 

Hope you find my instructions useful. 
Enjoy!

Til next time x

post signature

7 Sept 2014

Quilt Inspired Blanket Tutorial!

As promised, today I'm going to share the making process of my Quilt Inspired Blanket! 
If you can remember, it all started when I saw this photo on Pinterest.

My mind immediately started whirring and working out how I could translate this stunning piece of work into a crochet project. The simplest way, I thought, was to opt for a closed granny square. Sooooo.....if you're new to crochet and have mastered trebles and chains you can make this! It really is that easy :-)

So go grab a drink, settle yourself comfortably and let's get started!

For my blanket I used Cotton 8 from Scheepjeswol. It's 100% cotton and sport weight so not heavy at all. Always important when making a blanket! Plus it can thrown in the washing machine when needed. 

Ingredients


You will need:
Crochet hook - I used a size 4mm hook not 3.5mm as stated in my previous post (sorry!)
Scissors
Yarn as detailed below: 

Red - 510 (50g)
Burnt Orange - 671 (50g)
Orange - 716 (50g)
Yellow - 714 (50g)
Light Green - 642 (50g)
Bright Green - 517 (50g)
Light Blue - 622 (50g)
Dark Blue - 563 (50g)
Purple - 661 (50g)
White - 502 (450g)
Black - 515 (100g)

The quantities I've stated will be more than enough to make the blanket and you'll have some spare left over! I've written the pattern in English crochet terms. 


To start chain 4 and join with a slip stitch in the 4th chain from hook. Alternatively you can make a magic circle.


Round 1. Chain 3 (counts as first treble), 2 trebles into the circle you've formed with the chain, chain 1, 3 trebles into circle, chain 1, 3 trebles, chain 1, 3 trebles and finish with another chin 1. Join into the 3rd chain of the first stitch. You should end up with a teeny square as above.


Round 2. Chain 3 (counts as first treble). Into the top of the treble stitches rather than the spaces,  treble into next 2 stitches. To make the corner (same on each round) into the chain space created in the last round treble 2, chain 1, treble 2. Treble into the next 3 stitches. Make a corner and repeat until you have reached the first stitch. Slip stitch into the third chain to join. This is the pattern. Easy huh? Basically each round is being increased by the corner stitches. 


So on the third round you will have 7 trebles on the straight edge and 4 in each corner chain space. On the fourth round 11 trebles, the fifth is 15 trebles and the sixth you will have 19 trebles on the straight edge. There are always 4 trebles in each corner space. If you remember that each straight edge will increase by 4 trebles on each round you will to able to keep check on your stitch count. 


Each finished block is made up of 6 rounds. The pattern on the blanket is simply made by changing colour! Your finished block should look something like this.

For each row you will make:

2 blocks with 2 rounds of coloured yarn and 4 rounds of white
2 blocks with 4 rounds of coloured yarn and 2 rounds of white
1 block with 6 rounds of coloured yarn
2 blocks with 6 rounds of white

The placement is the same as the photo of the quilt.


For this tutorial I've just made up 3 blocks to show you how to join them. Please note, these squares have not been blocked! (lazy me!!!)

A little word on blocking! Whilst this yarn is a delight to work with, it improves enormously by blocking. The feel and drape is completely changed after a good old block. I tend to block as I go. 


Once your squares have been blocked, you're now ready to join. It's really nice and easy!


Place the right sides together.


Now simply double crochet into each opposite stitch, securing in the corner chain space.


The back will look something like this. 


And this is the front. It lies nice and flat. Tie in your tails and now it's time to make that funky border!!!

I really wanted to replicate the vertical stripes of the quilt, but didn't know how. Cue a google search and I found a gem of a tutorial on good old YouTube!

There are instructions for both Right Handed Hookers and also one for those of us who are Left Handed. 

It's to make a checker board effect (drafts for English folk!!!) but we are only going to make the stripes. I did 4 trebles in each of the black and white. I had to fudge it a little for the corners, so some stripes are only 3 stitches wide but you can't really tell ;-)


My border is 4 rows deep. For the start of the corners I made sure that I started in either black or white in the chain space, 2 trebles - chain 1 - 2 trebles. The same as the blocks. Follow the pattern on for each row.


You can see the corners more clearly in this photo. 

And that's it!!! 


I hope my instructions are nice and clear for you. If you have any questions, pop them in the comments box and I shall try and answer them :-)

Fancy making this blanket???? Well check back on Wednesday as I have a Cotton 8 kit to give away to one lucky reader :-)

Before I go..... have you seen this????


How exciting???? Check out the Scheepjeswol Facebook Page tomorrow for more information!
I don't know about you, but I'm swooning at those colours!!!

Til Wednesday ;-)
post signature

16 Mar 2014

Retro Flowers Blanket Tutorial!

As promised, this post is a tutorial for my Retro Flowers blanket.

I'd just like to add, at this point, that in no way am I claiming to have invented this pattern! I'm posting links to pattern sources and an alternative tutorial also. I've adapted the pattern ever so slightly to make it work for me.

Ok, that said, let's get on with making a blanket!!!

Ingredients
You will need:


Yarn (I've used the gorgeous Softfun by Scheepjeswol)
Crochet hook - I've used a 4mm hook as recommended
Scissors
Needle for sewing in ends

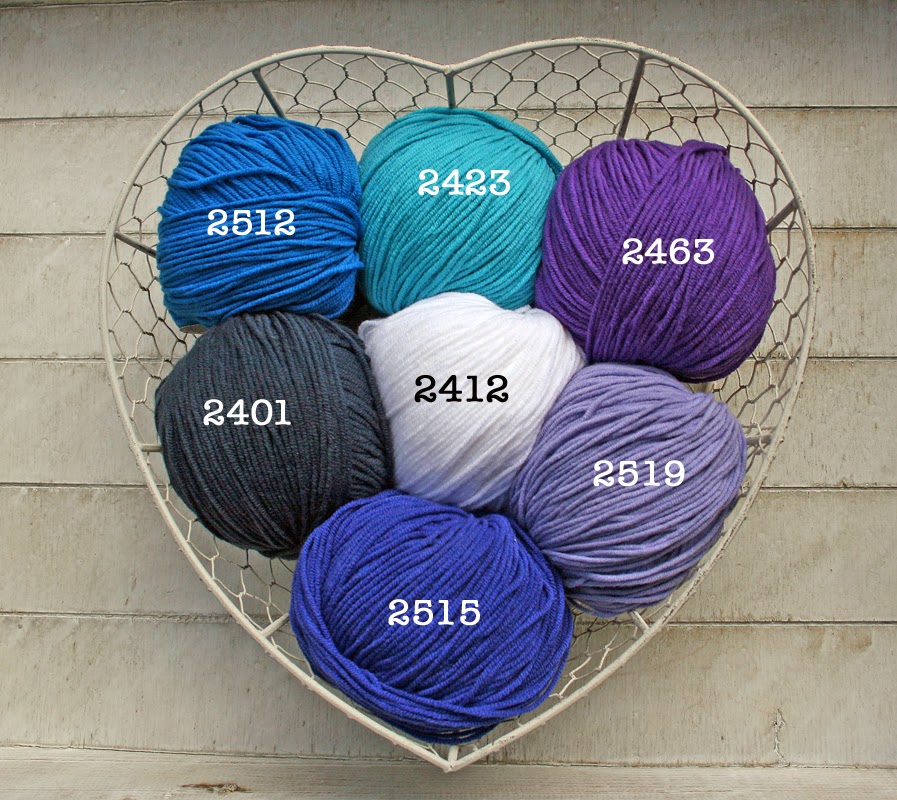
The colours I've used for my blanket are:


Quantities needed to make a blanket (finished blocked size: 135cm x 105cm including border):

2412: 9 x 50g
2401: 2 x 50g
2512: 2 x 50g
2423: 3 x 50g
2515: 2 x 50g
2463: 2 x 50g
2519: 3 x 50g

These quantities should be ample with a little left over.

The Retro Flower Pattern

I have used a starburst granny square pattern. It's a simple but effective pattern. If you google starburst granny square you'll end up with a heap of links to patterns and tutorials such as this one here.

Pattern is written in English Terms.

To start: with your centre colour, chain 5 and join in the 5th stitch from hook with a slip stitch. Alternatively you can start with a magic circle.


Round 1: Chain 3 (counts as treble crochet) and treble crochet into the centre space 15 times (16 trebles in total). Join with a slip stitch into the 3rd chain of the first stitch. Fasten off this colour.


Round 2: Join your next colour into any treble (Note: you're working in the top of the treble rather than the space in between the stitches).


Next we're going to make a puff stitch! (don't panic!! it's pretty easy if not a little fiddly!) Chain 1 (counts as start of the puff stitch), wrap your yarn round the hook, insert into same stitch that you joined the new yarn to and pull through (3 loops on hook) repeat this 2 more times until you have 7 loops on your hook.


Next, wrap your yarn around the hook once more and and pull through all 7 loops on the hook (this can be the fiddly bit!) Secure the stitch with a chain stitch and there you go! You've made a puff stitch! For the next puff stitch you don't ned to chain 1 to start. Simply wrap the yarn around the hook and insert into the next stitch to start the puff. Just remember that you always finish with 7 loops on the hook. 


Repeat until you have 16 puff stitches in total and join into the first puff stitch. Fasten off this colour.


You should end up with something like this (only not out of focus like mine is!!! sorry!)

Round 3: Join your next colour into a space between 2 puff stitches. Now for a cluster stitch! Again, the first cluster stitch is slightly different to the rest. Chain 2, yarn around hook, insert into the space where you have just joined in the new colour and pull through (3 loops on hook), pull through the first 2 loops on your hook (2 loops left on hook). Now repeat this twice more (4 loops on hook), yarn around hook once more and pull through all 4 loops. Chain 2. To make the next and following cluster stitches, yarn over hook and insert into the next space, pull through (3 loops on hook), yarn around hook and pull through the first 2 loops, repeat this 3 more times. You should have 5 loops on your hook. Yarn around hook and pull through all 5 loops. Chain 2. 


Repeat this until you have 16 cluster stitches and join with a slip stitch in the first cluster stitch. Fasten off.


Round 4: Join in your next colour into a 2 chain space.


Now we are going to make the circle into a square! In the 2 chain space work 3 double crochets. In the next space work 3 half treble crochets. To make the corner in the next space work 3 trebles, chain 2 and a further 3 trebles


Continue around the circle working into each space as follows: 3 half trebles, next space 3 doubles, next space 3 half trebles, next space corner as before. You should end up with something like this...


And that's the completed square. At this point I will normally block the squares.

Joining the squares: For the purpose of this tutorial I have used a coloured yarn to join the squares. This is simply to show the join more clearly. You will join in the same colour as your last round. There a lots different joining techniques but to give an almost invisible join I really like this technique. It's quick and very effective.


With right sides together, join your yarn into a corner space. Chain 3, double crochet into the next space, chain 3, double crochet...and so on and so on...


When opened out it will look something like this.


Squares joined with white yarn. Wrong side facing.


Right side facing.
Continue joining all your squares in this method. 

Blanket Border: For my border I added a simple row of 3 trebles in each space. For the bits where the corners of each square are joined I did a treble in the corner space, treble in the join and a treble in the next corner space.  The corners were created by making 3 trebles, chain 2, 3 trebles into each corner space. This ensures that the blanket lies flat and doesn't become too ruffled. 

The actual border I used is a shawl border. It's designed by Doris Chan and can be found as free download here. (You'll need a Ravelry account to download the pattern). I simply added the border part of the shawl adjusting as needed to fit the stitches in the blanket border.


Once the border was finished I blocked the blanket again. This really showed off the finished border nicely.


Finished blanket!

I hope you have understood my instructions! I've tried to make them as simple as possible so that beginners can have a go at the blanket. If you get stuck, don't understand....or spot a mistake!!!...please let me know and I'll try to help.

Til next time!
Mx
TEMPLATE DESIGNED BY PRETTYWILDTHINGS