Check out my softfun posts!
Showing posts with label softfun. Show all posts

3 Jun 2015

Spring Cushion Tutorial

Ok.... *embarrassed coughs*.....so let's just call this a Spring/Summer Cushion tutorial ;-)
Oh dear...I'm really not good at this keeping my blog updated malarkey am I???
So let's just pretend almost 2 months haven't elapsed since my last post!

Let's make a cushion!!!!!

You will need:

Yarn (obviously!) I've used Scheepjeswol Soft Fun Denim and Regular Soft Fun. 

Soft Fun Denim Colour 500 x1 50g ball
Soft Fun Denim Colour 503 x1 50g ball
Soft Fun Denim Colour 505 x1 50g ball
Soft Fun Denim Colour 506 x1 50g ball
Soft Fun Colour 2412 x4 50g balls (I used about 3 and a half balls)
I've used the recommended 4mm crochet hook
Scissors and a darning needle (to weave in the ends)
Cushion Pad
Lot's of patience for the pom pom edging!!! (I find a gin and tonic really helps with this although not so much that you can't see.....because that's not good!!!)
Let us begin!
For my tutorial I've used a different colour palette as I ran out of yarn!
NOTE!!!! I USE ENGLISH CROCHET TERMS. THE ROSIE POSIE SQUARE IS IN ENGLISH TERMS AND THE POM POM EDGING IS IN AMERICAN TERMS
The pattern I've used for the squares is the Rosie Posie pattern by Cherry Heart.
I'm not going to go through this step by step as there is a lovely tutorial that can be found on Sandra's blog here.....and why reinvent the wheel??!!!!
I used 4 different colour combinations for my squares. The first 2 rounds I worked in one colour, round 3 in another colour, round 4 in another colour and the final round in the main colour. 
For the reverse of the cushion I made 4 coloured squares (one of each) and 12 squares in purely the main colour. That's 32 squares in total.
So after the first 2 rounds you will have something resembling this....

Then the next round...


And another!


Then finally adding the corners and making a square.


At this point I like to block my squares.


So let's start and join them together...


To join, place your squares wrong sides together and double crochet into each stitch. When joining corner together double crochet into the corner space, chain 1 and double crochet into the next space.
Repeat until all your squares are joined. Now weave in the ends. 
So to summarise....you are going to have 4 rows of 4 squares for both the front and the back. The front will consist of 16 multi coloured squares and the back will have 4 multi coloured squares in the centre and they will have 12 main colour squares around them


Something like this!


To make a border for both cushion sides work a row of double crochet in the same colour as you joined your squares. Work a double crochet into the corner spaces down the sides then a chain as you did when you joined the squares. For the corners work 1 double crochet, 1 chain, 1 double crochet. Fasten off yarn.


Change colour. Next row work in treble crochet all the way round. Treble crochet into the chain spaces on the sides and into the corner chain work 1 treble, 1 chain, 1 treble. Fasten off.
Change colour. Work another row of trebles. For the corner work 2 trebles, 1 chain, 2 trebles into the chain space. 
Repeat this process for both the front and back.


Next you are going to join your cushion front and back together. Using the same colour that you are going to use for your pom pom edging and with wrong sides together join using a double crochet. This is where I confess that I was a complete lazy so and so and rather than making a nice opening for my cushion with buttons, I just joined 3 sides, shoved the cushion pad in and joined the final side!!!!
But if you're not lazy, like me, and want to do it properly....join 3 sides, work a row of double crochet along the back side and then the front. This will take you to the point where you are ready to make the pom pom edging. Ok...deep breath....glug of gin....you can do it!!!!

The pom pom edging I modified from this lovely blog. There is a wonderful step by step tutorial!
I wanted my pom poms to sit snuggly around the cushion edge, so instead of working 6 chains I worked 3 chains So start with a double crochet, chain 3 and work the pom pom into the double crochet. In between each pom pom I worked 3 chains, skipped 3 stitches and worked the pom pom into the next double crochet. Before you start I need to point out that the pom pom has a back and a front!


This is the front view...


And this is the back!

And just to complicate matters....I'm left handed! So I work patterns in the opposite way to right handed hookers. So just check that you're pom poms are facing the right way!!! And that is something I never thought I'd find myself saying!!!


Carry on around the cushion making pom poms. I had to slightly adjust the spacing to make sure I had a pom pom at each corner point :-)
For those of you not lazy hookers you can now insert your cushion pad and secure with buttons. The spaces in-between trebles make great button holes!
And there you have one Spring/Summer cushion!
For those hookers outside of Holland....Scheepjeswol Soft Fun can be purchased from Deramores.
(affiliate link)
post signature

6 Apr 2015

Spring Cushion Tadah!!!!

Well I hope you have all had a lovely Easter :-)
I have had a much needed 4 day break from work and I've crammed so much in to it! Of course, I've managed a little R&R too ;-) The weather here has been glorious over the last 2 days. Thankfully Friday it rained and Saturday was cloudy.....otherwise none of the indoor chores would've been done! 
I've had a really creative few days......I can't wait to share some of the things I've been up to but more about that another time. Today I have some reveal photos to share of my finished cushion. My Spring Cushion as I've decided to call it :-)
If you remember, I used the new Soft Fun Denim and Soft Fun by Scheepjeswol.
This yarn is now available to buy from Deramores :-)

Beautiful bright and cheerful colours.....they make me smile big time!


I really love this yarn!
It's great to hook with and is very soft and snuggly.
Ok enough waffle....let's get down to looking at the cushion ;-)


Ah those colours together do make me smile!


I added a pom pom edging as I felt it suited the fun feel of the cushion


The back is slightly different


I love how the colours work with my throw and garden bench....a complete coincidence....honest!!!


Here you can see the pom pom edging a little clearer...


I added a simple border to the cushion to bring it up to size!


And what better way to enjoy this spring sunshine then relaxing with a cuppa and an Easter egg ;-)
Ok some details....
Yarn
Soft Fun Denim Colour 500 x1 50g ball
Soft Fun Denim Colour 503 x1 50g ball
Soft Fun Denim Colour 505 x1 50g ball
Soft Fun Denim Colour 506 x1 50g ball
Soft Fun Colour 2412 x4 50g balls (I used about 3 and a half balls)
I've used the recommended 4mm crochet hook
Pattern
Rosie Posie Grannie Square by Cherry Heart
I will be writing a full tutorial on how make the cushion so keeping popping back!
Til next time x
post signature

25 Mar 2015

Introducing Soft Fun Denim!

Oooh I do love a new yarn!
Especially when it's as gorgeous as this :-)
I've been lucky enough to get my hands on some of the brand new Soft Fun Denim by Scheepjeswol.
Oh these people really do know how to produce a fabulous yarn!
It has the same properties as regular Soft Fun, but in eleven gorgeous new shades that are ever so slightly variegated giving a lovely hand dyed effect.
It's a 60% cotton 40% acrylic mix. 50g gives you 140m of delicious yarn and the recommended hook size is 3.5 - 4mm. It is SO SOFT!!!!!

I'm completely smitten and in love with this yarn. I chose 4 bright and cheerful colours for my project  (left to right - 500, 506, 505 and 503) and also added in some plain white (2412) .


Oh, and I should mention that the yarn band has changed too. No big deal I hear you say! Well it is for me! Previously, Soft Fun was packaged in doughnut shaped balls, and the yarn label went right through the centre. Well try as I might, I just couldn't get the dratted label off without ripping it. Now that's no longer a problem :-)

So what to make? A little project....something quick but bright and cheerful!
Check back again for a progress update.
Til then!
PS I forgot to mention that Deramores is stocking this yarn here!
post signature

16 Mar 2014

Retro Flowers Blanket Tutorial!

As promised, this post is a tutorial for my Retro Flowers blanket.

I'd just like to add, at this point, that in no way am I claiming to have invented this pattern! I'm posting links to pattern sources and an alternative tutorial also. I've adapted the pattern ever so slightly to make it work for me.

Ok, that said, let's get on with making a blanket!!!

Ingredients
You will need:


Yarn (I've used the gorgeous Softfun by Scheepjeswol)
Crochet hook - I've used a 4mm hook as recommended
Scissors
Needle for sewing in ends

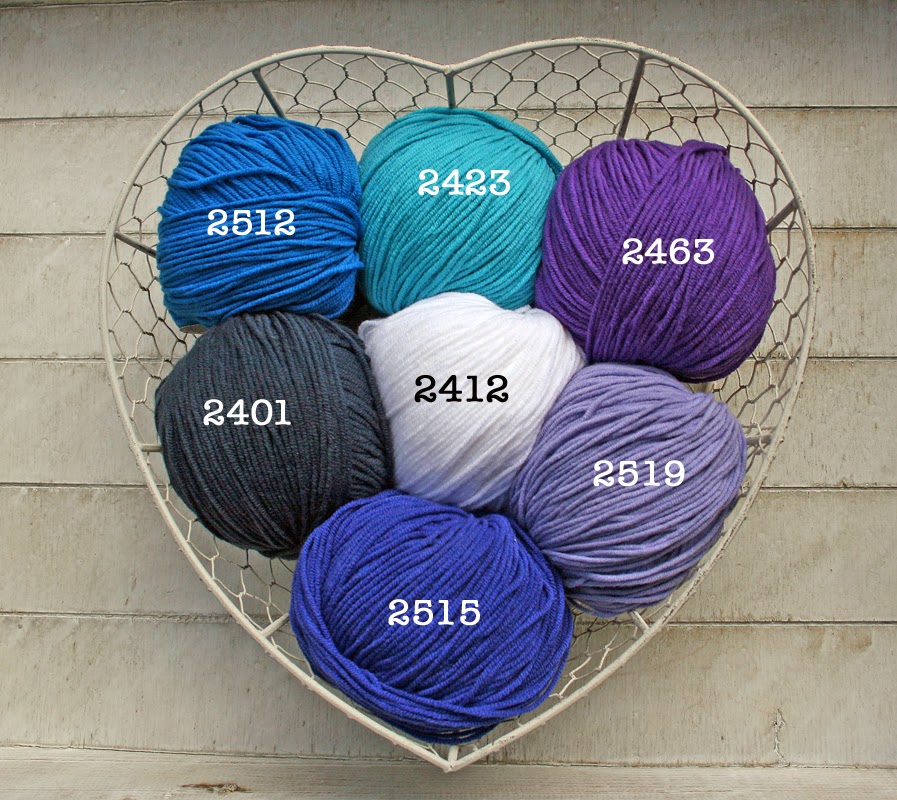
The colours I've used for my blanket are:


Quantities needed to make a blanket (finished blocked size: 135cm x 105cm including border):

2412: 9 x 50g
2401: 2 x 50g
2512: 2 x 50g
2423: 3 x 50g
2515: 2 x 50g
2463: 2 x 50g
2519: 3 x 50g

These quantities should be ample with a little left over.

The Retro Flower Pattern

I have used a starburst granny square pattern. It's a simple but effective pattern. If you google starburst granny square you'll end up with a heap of links to patterns and tutorials such as this one here.

Pattern is written in English Terms.

To start: with your centre colour, chain 5 and join in the 5th stitch from hook with a slip stitch. Alternatively you can start with a magic circle.


Round 1: Chain 3 (counts as treble crochet) and treble crochet into the centre space 15 times (16 trebles in total). Join with a slip stitch into the 3rd chain of the first stitch. Fasten off this colour.


Round 2: Join your next colour into any treble (Note: you're working in the top of the treble rather than the space in between the stitches).


Next we're going to make a puff stitch! (don't panic!! it's pretty easy if not a little fiddly!) Chain 1 (counts as start of the puff stitch), wrap your yarn round the hook, insert into same stitch that you joined the new yarn to and pull through (3 loops on hook) repeat this 2 more times until you have 7 loops on your hook.


Next, wrap your yarn around the hook once more and and pull through all 7 loops on the hook (this can be the fiddly bit!) Secure the stitch with a chain stitch and there you go! You've made a puff stitch! For the next puff stitch you don't ned to chain 1 to start. Simply wrap the yarn around the hook and insert into the next stitch to start the puff. Just remember that you always finish with 7 loops on the hook. 


Repeat until you have 16 puff stitches in total and join into the first puff stitch. Fasten off this colour.


You should end up with something like this (only not out of focus like mine is!!! sorry!)

Round 3: Join your next colour into a space between 2 puff stitches. Now for a cluster stitch! Again, the first cluster stitch is slightly different to the rest. Chain 2, yarn around hook, insert into the space where you have just joined in the new colour and pull through (3 loops on hook), pull through the first 2 loops on your hook (2 loops left on hook). Now repeat this twice more (4 loops on hook), yarn around hook once more and pull through all 4 loops. Chain 2. To make the next and following cluster stitches, yarn over hook and insert into the next space, pull through (3 loops on hook), yarn around hook and pull through the first 2 loops, repeat this 3 more times. You should have 5 loops on your hook. Yarn around hook and pull through all 5 loops. Chain 2. 


Repeat this until you have 16 cluster stitches and join with a slip stitch in the first cluster stitch. Fasten off.


Round 4: Join in your next colour into a 2 chain space.


Now we are going to make the circle into a square! In the 2 chain space work 3 double crochets. In the next space work 3 half treble crochets. To make the corner in the next space work 3 trebles, chain 2 and a further 3 trebles


Continue around the circle working into each space as follows: 3 half trebles, next space 3 doubles, next space 3 half trebles, next space corner as before. You should end up with something like this...


And that's the completed square. At this point I will normally block the squares.

Joining the squares: For the purpose of this tutorial I have used a coloured yarn to join the squares. This is simply to show the join more clearly. You will join in the same colour as your last round. There a lots different joining techniques but to give an almost invisible join I really like this technique. It's quick and very effective.


With right sides together, join your yarn into a corner space. Chain 3, double crochet into the next space, chain 3, double crochet...and so on and so on...


When opened out it will look something like this.


Squares joined with white yarn. Wrong side facing.


Right side facing.
Continue joining all your squares in this method. 

Blanket Border: For my border I added a simple row of 3 trebles in each space. For the bits where the corners of each square are joined I did a treble in the corner space, treble in the join and a treble in the next corner space.  The corners were created by making 3 trebles, chain 2, 3 trebles into each corner space. This ensures that the blanket lies flat and doesn't become too ruffled. 

The actual border I used is a shawl border. It's designed by Doris Chan and can be found as free download here. (You'll need a Ravelry account to download the pattern). I simply added the border part of the shawl adjusting as needed to fit the stitches in the blanket border.


Once the border was finished I blocked the blanket again. This really showed off the finished border nicely.


Finished blanket!

I hope you have understood my instructions! I've tried to make them as simple as possible so that beginners can have a go at the blanket. If you get stuck, don't understand....or spot a mistake!!!...please let me know and I'll try to help.

Til next time!
Mx
TEMPLATE DESIGNED BY PRETTYWILDTHINGS