Check out my border posts!
Showing posts with label border. Show all posts

26 Sept 2018

Kizzy Blanket - FREE PATTERN

Evening!
I thought I'd post the pattern for Kizzy tonight rather than waiting until the weekend.
Why? Well....because tomorrow I'm heading down to Harrogate to meet up with my Tribe! Yup....tis that time of year again when all the Scheepjes bloggers meet up and then Yarndale! . Sadly, Christa won't be joining us this year....we'll miss you 😘....but I do get to finally meet Matt, Christina and Rachele! I cannot wait. Nothing has been packed....in fact some clothes are still drying!!! Think it's going to be a mad morning dash!

Ok down to business....


Let's get going and make a Kizzy Blanket!!!

There isn't a step by step tutorial for this blanket but there ain't anything too complicated so don't stress. If you get stuck with a stitch, go check out youtube! Esther (It's all in a Nutshell) has some fabulous stitch tutorials. You can find her channel HERE.

INGREDIENTS

943 Mekong x 5 balls
962 Narmada x 2 balls
961 Mersey x 2 balls
944 Nile x 2 balls
956 Avon x 2 balls
955 Po x 2 balls
952 Rhine x 2 balls
954 Congo x 2 balls
957 Eisak x 2 balls
958 Tiber x 2 balls
946 Mississippi (does anyone else chant that rhyme when spelling this?!) x 2 balls 

3.5mm hook
4.5mm hook (for the main joining)
Scissors
Darning needle (to weave in those pesky ends!)
Blocking board/mat and pins
Plastic safety pins (optional)
Gin (oops!)

The finished blanket measures 115cm wide and 155cm long. 
It weighs 1014g (how precise!!)

HOW TO....

Ok first think is to put the 5 balls of Mekong to one side. We will use that for the joining and border. 
You are permitted to keep taking it out of the bag and admire the gorgeous colour....obviously!
And maybe a little stroking and sniffing.....but NO DROOLING! It spoils the yarn!

First you will need to make lots and lots of granny squares. 124, 3-round squares (which will make 31 larger squares when joined together) and 32, 6-round squares. I have worked every round in a different colour, chosen at random. 

*Written in UK Terms*

Abbreviations

ch - chain
dc - double crochet
tr - treble crochet
htr - half treble crochet
trcl - treble cluster
slst - slip stitch
st - stitch
rpt - repeat
ch-sp - chain space
sk - skip
dtr - double treble


Basic Granny Square Pattern

 Using a 3.5mm hook, chain 4 and slip stitch into the last chain.
Round 1 ch3 (counts as first treble), work 2tr into ch ring, ch2, *3tr into ch ring, ch2 rpt from *twice more. slst into 3rd chain. Fasten off. 
Round 2 Using different colour yarn join in any corner and ch3, 2tr in ch-sp, ch1, *(3tr, ch2, 3tr) in next ch-sp, ch1. Rpt from * twice more. 3tr in last corner space, ch2 and slst into 3rd chain. Fasten off.  
Round 3 Using different colour yarn join in any corner and ch3, 2tr in ch-sp, ch1, 3tr in next ch-sp, ch1, *(3tr, ch2, 3tr) in next ch-sp, ch1, 3tr in next ch-sp, ch1. Rpt from * twice more. 3tr in last corner space, ch2 and slst into 3rd chain. Fasten off.  

This is your small 3 round square finished. Weave in ends...do it now or you'll regret it later!
Now make 123 more!!!


To make the 6 round squares just work another three round in this fashion. Working 3 trebles into the chain spaces along the sides and 3 trebles joined with a 2 chain in the corners. Don't forget to chain 1 between the trebles. It'll help you squares lie flat. You need to make 32 of these. 

Now you have all of your squares made you need to block them. 


Block the small squares to 3 inches and the big squares to 6 inches
(my homemade blocking board is covered in inch gingham so it makes it really easy to measure!)


Blocking really does make a difference!

Joining

Ok, we are going to use 2 different joining techniques. 
For the small squares we are going to join them so the join is almost invisible. 

With right sides together, using a 3.5mm hook and yarn that matches one of the squares, join in one of the corner spaces. Double crochet, chain 3, double crochet in the next chain space, chain 3, double crochet in the next chain space, chain 3 and then double crochet in the corner. Fasten off. 
Repeat this process with another 2 squares and then join them both together using the same method.


The back should look something like this...


And when you flip it over, it should look like this.
Weave in ends. 

Once you have joined all of the little squares together you are ready to think about placement and joining. 


I made myself a chart to work out where I wanted my squares to go...


And then laid them out on the living room floor. I also took photos at this point (my cats take great pleasure in knocked over carefully made piles of squares!!!) and then piled them up in rows.

I've joined the squares using a zipper join. It's fiddly but gives a lovely neat appearance. 
Dedri has a fab tutorial HERE for this method. 

Join all of the squares using Mekong yarn and a 4.5mm hook. It's important to move up hook size (or two) for this process otherwise your squares may not lie flat. 


Joining the first row is always tricky. The squares have a tendency to flap round! This is where those little plastic safety pins come in handy. Secure the corners together as above and that should keep everything in place. 

(If you are right handed you will start joining from the top left hand corner. Left handers will start from the bottom right hand corner!)


Ok now continue joining all the vertical rows and then the horizontal ones. 


Then, using a 3.5mm hook, work a row of double crochet around the edges working one double crochet into each stitch, one into the chain space and joins and one into each corner. Fasten off. 


It should be looking something like this....


Ready to make the fancy pants border???!!!
(Don't worry...it's not that tricky!)

Here's where I confess to forgetting to take photos after each border round.
*SORRY!*

Border Instructions

Round 1 Using Mekong and 3.5mm hook work a round of htr with (htr, ch2, htr) in the corner stitches. Fasten off.
Round 2 Join in first st of edge. ch1, dc in first st, *ch3, sk3 st, dc rpt from * along edge to corner (NB you will probably have to only sk2 at one point along the edges), work (dc, ch2, dc) into corner ch-sp. Continue around the blanket and join with a slst. Fasten off. 
Round 3 Join in first dc of an edge. ch3 (counts as first tr of cluster) and continue to work the trcl in dc, ch3, trcl in dc. Rpt to corner. (ch2, trcl in ch-sp, ch2) to make corner. Repeat around. Slst into top of first cluster. 
Round 4 ch1, dc in first st, ch3, dc in top of trcl, ch3. Repeat all the way around the blanket and join with a slst into first dc.
Round 5 ch1, dc in first stitch, in next dc work (tr, ch1, tr, ch1, tr, ch1, tr) dc in next dc. This makes a fan shape. Repeat along each edge until you get to the corners. the corners are as follows: (working into the corner trcl, tr, ch2, dtr, ch3, dtr, ch2, tr) dc in next dc. Continue around and slst into first dc. 
Round 6 ch 3 (counts as tr), into centre chain of fan from previous round work (tr, ch1, tr, ch1, tr, ch1, tr), tr in dc of previous round. Repeat along edge. Into corner ch-sp work (ch1, tr, ch1, tr, ch1, tr, ch1, tr, ch1, tr, ch1. Continue around blanket and finish with slst into 3rd chain.
Round 7 ch3 (counts as tr) ch1, *tr in next st, ch1. Rpt from * all around blanket and join with slst.
Round 8 ch1, dc in first st. dc in every dc and ch-sp around blanket. At the centre chain space of the fan work a chain instead of a dc to give a nice peak. slst in first stitch and fasten off. 
Weave in ends.


Now you are ready to block the blanket to make that border truly sing!


I've very firmly pinned my blanket out on the play mats I use for blocking larger projects....


Making sure that the corners are nicely defined. 

Ok so that's it! Now you should now have a lovely Kizzy blanket of your own.


Hopefully next time I'll have some pics and gossip from Yarndale!
Do drop by the Scheepjes stand (B16) and say hello if you're attending!

Til next time x

post signature

31 Dec 2017

Water Lilies Blanket Free Pattern

Evening!

So, as promised, today I'm going to share the instructions to make my Water Lilies blanket. 


If you can remember all the way back to this post, I fell in love with Scheepjes Secret Garden yarn.
It's one of their premium yarns and a slightly extravagant choice to make a blanket with but hey ho....in the words of that hair product advert...."because you're worth it" 😉

I settled on 3 main colours for my blanket.


From left to right: 709 Lily Pond, 703 Secluded Lake and 702 Herb Garden.

The colours reminded me of a version (one of many!) of Water Lilies by the artist Claude Monet....


And the name of the blanket was found!
The blanket is an easy make. Suitable for beginners and the more experienced hookers alike. For the latter, it's a good TV project!

Any enough chatter...let's get on with it!

INGREDIENTS 

To make a blanket 140cm x 110cm (blocked)

709 Lily Pond 7 x 50g balls (5 for the squares and 2 for joining and border)
703 Secluded Lake 6 x 50g balls
702 Herb Garden 6 x 50g balls
736 Bird Bath 1 x 50g ball (for border)

4mm crochet hook
5mm crochet hook
Needle for weaving in ends
Scissors
Blocking equipment

SQUARE PATTERN (UK TERMS)


Using a 4mm hook chain 4 and join with a slip stitch.

Round 1. Into chain circle just formed chain 3 (counts as first treble) treble 2 more stitches. Chain 2 to form the first corner. *Work 3 trebles into the circle and chain 2. Repeat from * 2 more times and join with a slip stitch in the 3rd chain of the first stitch (12 treble crochet and 4 2-ch spaces)

Round 2. Chain 3 (counts as first treble), work 2 trebles into the next 2 stitches and 2 more into the corner 2-ch space, chain 2 to form the corner and work another 2 treble into the corner 2-ch space. *Work 3 trebles into the next 3 stitches, (2tr, ch2, 2tr) in corner 2-ch space. Repeat from * 2 more times and join with a slip stitch to the third chain of first stitch. (28 treble crochet and 4 2-ch spaces)

Round 3. Chain 3 (counts as first treble), work 5 trebles into the next 5 stitches. Make the corner in the usual way (2tr, ch2, 2tr) *work 7 treble crochet into the next 7 stitches and (2tr, ch2, 2tr) in to the corner 2-ch space. Repeat from * 2 more times. Work 2 treble crochets into to the first 2 stitches and join with a slip stitch as before. Fasten off yarn and weave in ends. (44 treble crochet and 4 2-ch spaces)

You will need to make 221 square in total. I used 6 balls of both Secluded Lake and Herb Garden but only 5 of Lily Pond.

Block to 3 inch square. 

TOP TIP

Due to the nature of the yarn, there are variations in thickness. When you get to thinner bits work a little looser and vice versa. You may have to stretch some of the squares more than others. Don't panic! It'll all come good in the end!

JOINING

Ok, now you have made all of your squares it's time to join them together. 
I have 13 squares across and 17 squares down.


I laid the squares out to check that I was happy with the colour placement (I'm a Virgo.....I don't really do random!!!) I then took a quick snap with my phone for reference and then carefully made 17 piles of 13 squares ready to be joined. I also placed them in order. 

Obviously you can take a more relaxed and random approach!

Join with Lily Pond colour way using a 5mm hook. 
I have chosen a larger hook to join with as I'm using a zipper joining method. The larger hook size gives you a bit of give in the join. 

Esther from It's All In A Nutshell has made a fabulous video giving clear instructions about this joining method. (Just ignore the different squares, she made the videos for the Last Dance CAL)

You can find the tutorial HERE for Right handers and HERE for Left Handers 😊

I have joined my blanket in exactly the same method.

So now your squares are all joined we can now move onto the border.

BORDER

 Round 1. Using a 4mm hook and Lily Pond join the yarn into any BACK LOOP of the edge. Chain 3 (counts as first treble) and then work treble crochets into the back loops of stitches all the way round the blanket. The corners are made the same as before (2tr, ch2, 2tr) into the corner chain spaces. Once you have worked all the way round join as before and fasten off. 

Round 2. Using Bird Bath join in the first stitch of an edge. Ch1, double crochet in same stitch. *Chain 3, skip 2 stitches, double crochet in next stitch. Repeat from * to corner. (You may have to fudge this a little to ensure you finish at the corner with a dc, don't worry! It will look ok once we have worked the next round) Chain 3 at corner and double crochet in the first stitch of the next edge. Continue around the blanket and join with a slip stitch into the first double crochet. 

Round 3. Chain 1 and double crochet in the same stitch.  work *(2dc, ch3, 2dc) into the 3-ch space, double crochet in next stitch. Repeat from * all the way around the blanket (omitting the final dc at the end) and join with a slip stitch to the first dc.

Now you can block your border. 


It should look something like this!
A delicate frilly edge.


I'll leave you with another photo of the finished blanket. 
I do hope you can understand my instructions!

Til next time x

post signature

30 Jun 2014

Border Control.....

Ah don't you just LOVE it when you reach that stage in a project when it's time to decide on what border will suit said project????

Well that's where I'm at right now! OK, that's not exactly true. I'm a little bit past that stage! I've had a weekend of frantically joining and have managed to make a start on the border :-)


I just love how this blanket is turning out! I decided on a double crochet, chain 1, double crochet joining technique. I felt this gave a lovely solid edge to the squares. It might look a little bumpy in the  photograph but once blocked it will settle down nicely :-)


The border was a little trickier to decide on! I have to admit to ripping it back THREE times before I was happy. I've decided on a mix from different sources with lots of adaptations. There will be some nice rows of easy peasy stitch combinations and I'm planning to finish with a lacy edge. Well that's the plan anyway!!!


I'm having a mad hooky time trying to get it finished and blocked so that I can take some lovely TA DAH!!! photos at the weekend. Please pray for good weather ;-)

So to recap. I am using Invicta Colour (shades 968 and 960) and Invicta Extra (shade 1466) both are made by Sheepjeswol. I'm using a 4mm hook just because I'm a tight hooker :-) The recommended hook size is 3mm!

Invicta Colour is now available from Deramores :-) So far I've used 300g of each of the Invicta Colours and 350g of the Invicta Extra. 

Once it's finished I shall give finished quantities and I'll measure the blanket for you.
Til next time!

Mx

16 Mar 2014

Retro Flowers Blanket Tutorial!

As promised, this post is a tutorial for my Retro Flowers blanket.

I'd just like to add, at this point, that in no way am I claiming to have invented this pattern! I'm posting links to pattern sources and an alternative tutorial also. I've adapted the pattern ever so slightly to make it work for me.

Ok, that said, let's get on with making a blanket!!!

Ingredients
You will need:


Yarn (I've used the gorgeous Softfun by Scheepjeswol)
Crochet hook - I've used a 4mm hook as recommended
Scissors
Needle for sewing in ends

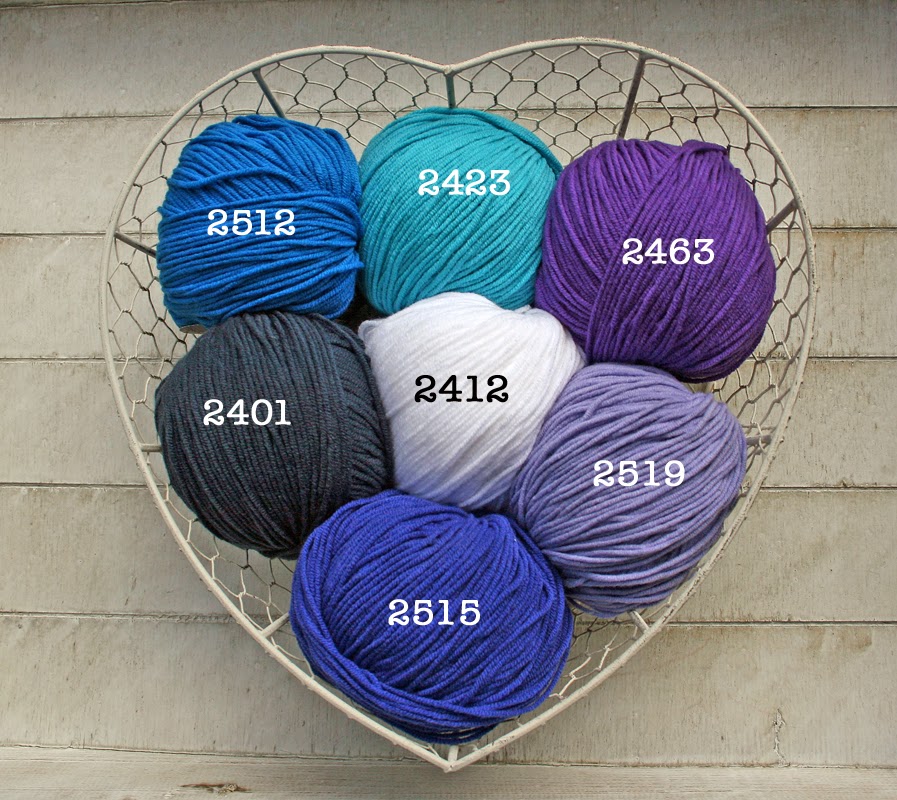
The colours I've used for my blanket are:


Quantities needed to make a blanket (finished blocked size: 135cm x 105cm including border):

2412: 9 x 50g
2401: 2 x 50g
2512: 2 x 50g
2423: 3 x 50g
2515: 2 x 50g
2463: 2 x 50g
2519: 3 x 50g

These quantities should be ample with a little left over.

The Retro Flower Pattern

I have used a starburst granny square pattern. It's a simple but effective pattern. If you google starburst granny square you'll end up with a heap of links to patterns and tutorials such as this one here.

Pattern is written in English Terms.

To start: with your centre colour, chain 5 and join in the 5th stitch from hook with a slip stitch. Alternatively you can start with a magic circle.


Round 1: Chain 3 (counts as treble crochet) and treble crochet into the centre space 15 times (16 trebles in total). Join with a slip stitch into the 3rd chain of the first stitch. Fasten off this colour.


Round 2: Join your next colour into any treble (Note: you're working in the top of the treble rather than the space in between the stitches).


Next we're going to make a puff stitch! (don't panic!! it's pretty easy if not a little fiddly!) Chain 1 (counts as start of the puff stitch), wrap your yarn round the hook, insert into same stitch that you joined the new yarn to and pull through (3 loops on hook) repeat this 2 more times until you have 7 loops on your hook.


Next, wrap your yarn around the hook once more and and pull through all 7 loops on the hook (this can be the fiddly bit!) Secure the stitch with a chain stitch and there you go! You've made a puff stitch! For the next puff stitch you don't ned to chain 1 to start. Simply wrap the yarn around the hook and insert into the next stitch to start the puff. Just remember that you always finish with 7 loops on the hook. 


Repeat until you have 16 puff stitches in total and join into the first puff stitch. Fasten off this colour.


You should end up with something like this (only not out of focus like mine is!!! sorry!)

Round 3: Join your next colour into a space between 2 puff stitches. Now for a cluster stitch! Again, the first cluster stitch is slightly different to the rest. Chain 2, yarn around hook, insert into the space where you have just joined in the new colour and pull through (3 loops on hook), pull through the first 2 loops on your hook (2 loops left on hook). Now repeat this twice more (4 loops on hook), yarn around hook once more and pull through all 4 loops. Chain 2. To make the next and following cluster stitches, yarn over hook and insert into the next space, pull through (3 loops on hook), yarn around hook and pull through the first 2 loops, repeat this 3 more times. You should have 5 loops on your hook. Yarn around hook and pull through all 5 loops. Chain 2. 


Repeat this until you have 16 cluster stitches and join with a slip stitch in the first cluster stitch. Fasten off.


Round 4: Join in your next colour into a 2 chain space.


Now we are going to make the circle into a square! In the 2 chain space work 3 double crochets. In the next space work 3 half treble crochets. To make the corner in the next space work 3 trebles, chain 2 and a further 3 trebles


Continue around the circle working into each space as follows: 3 half trebles, next space 3 doubles, next space 3 half trebles, next space corner as before. You should end up with something like this...


And that's the completed square. At this point I will normally block the squares.

Joining the squares: For the purpose of this tutorial I have used a coloured yarn to join the squares. This is simply to show the join more clearly. You will join in the same colour as your last round. There a lots different joining techniques but to give an almost invisible join I really like this technique. It's quick and very effective.


With right sides together, join your yarn into a corner space. Chain 3, double crochet into the next space, chain 3, double crochet...and so on and so on...


When opened out it will look something like this.


Squares joined with white yarn. Wrong side facing.


Right side facing.
Continue joining all your squares in this method. 

Blanket Border: For my border I added a simple row of 3 trebles in each space. For the bits where the corners of each square are joined I did a treble in the corner space, treble in the join and a treble in the next corner space.  The corners were created by making 3 trebles, chain 2, 3 trebles into each corner space. This ensures that the blanket lies flat and doesn't become too ruffled. 

The actual border I used is a shawl border. It's designed by Doris Chan and can be found as free download here. (You'll need a Ravelry account to download the pattern). I simply added the border part of the shawl adjusting as needed to fit the stitches in the blanket border.


Once the border was finished I blocked the blanket again. This really showed off the finished border nicely.


Finished blanket!

I hope you have understood my instructions! I've tried to make them as simple as possible so that beginners can have a go at the blanket. If you get stuck, don't understand....or spot a mistake!!!...please let me know and I'll try to help.

Til next time!
Mx
TEMPLATE DESIGNED BY PRETTYWILDTHINGS