Check out my crochet posts!
Showing posts with label crochet. Show all posts

17 Dec 2020

Hope - FREE Blanket Pattern

Hello!
I hope you are all well and staying safe!

Today I'm going to share the pattern for my Hope blanket.


It's very beginner friendly so perfect for all you new hookers that want to make your first blanket.

I've used Scheepjes Bamboo Soft for this project, however, you could merrily use Cotton 8, Organicon or Catona but the drape and lustre won't be the same (your yarn quantities may also differ).

YOU WILL NEED:

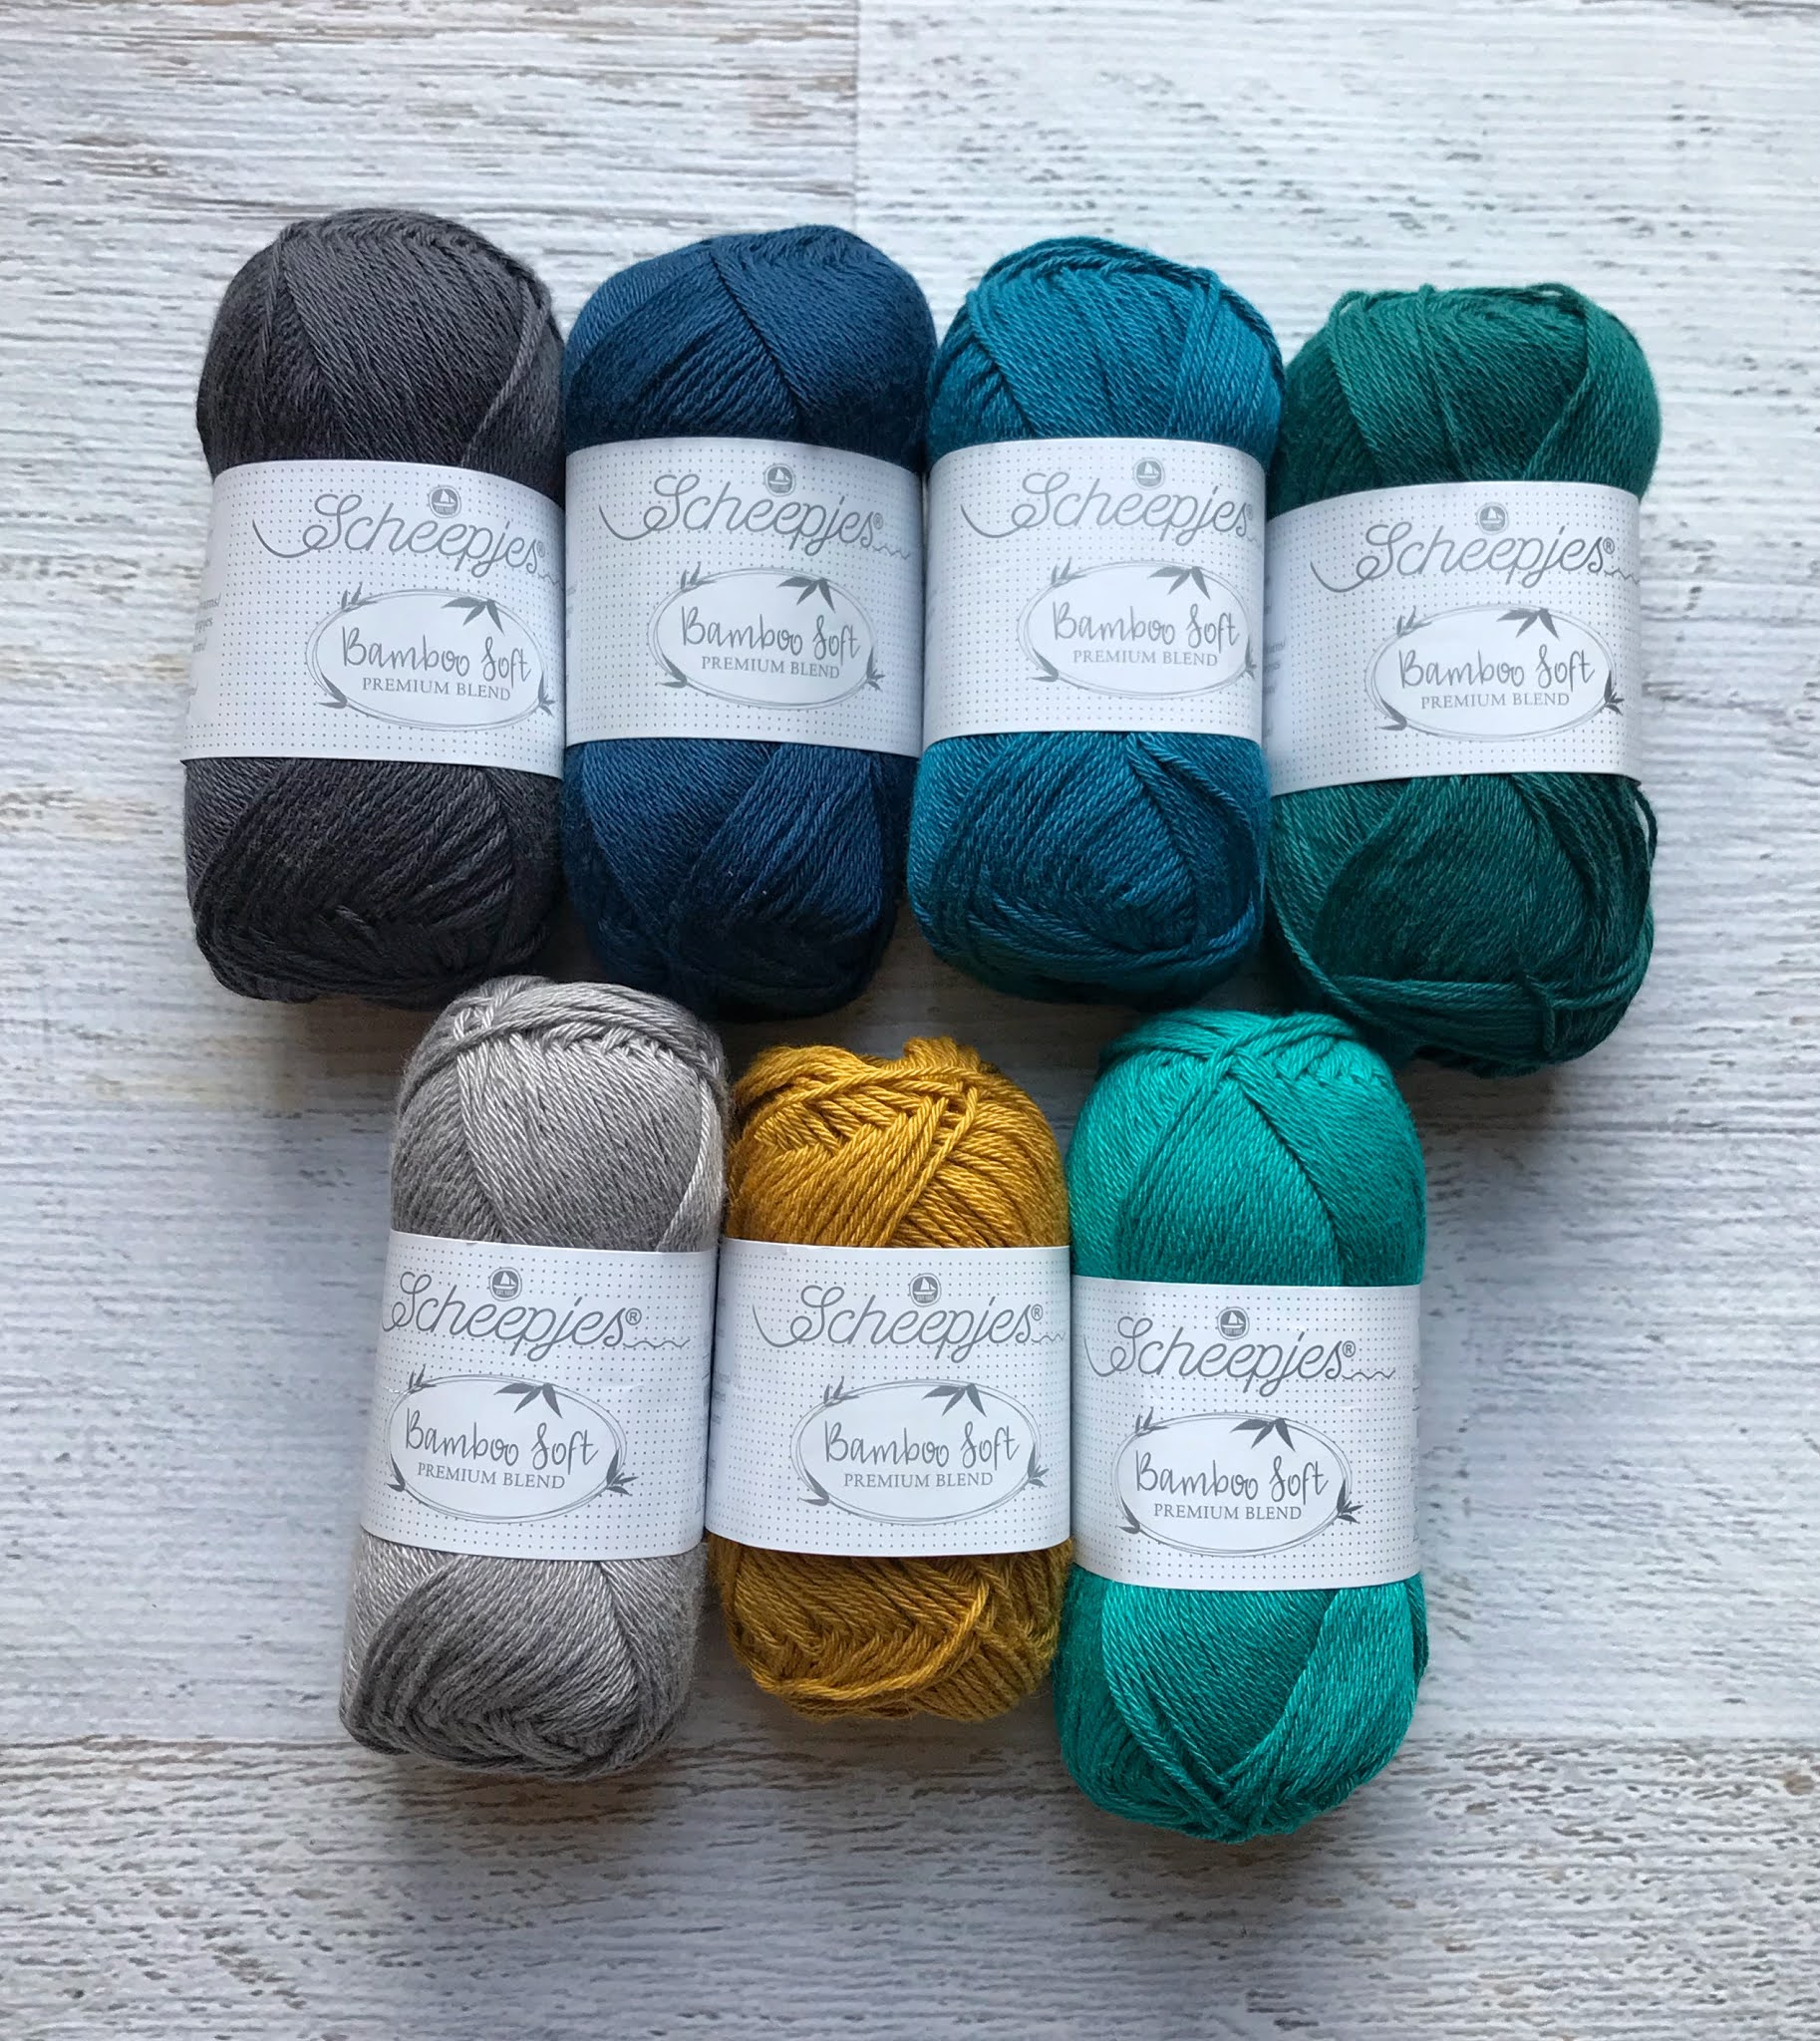
Scheepjes Bamboo Soft:
Antique Silver (264) x 18 balls
Smoky Diamond (263) x 1 ball
Blue Opal (253) x 1 ball
Golden Nugget (260) x 1 ball
Jade Lapis (258) x 1 ball
Mighty Spruce (254) x 1 ball

3.5mm crochet hook
Scissors
Needle to weave in ends
Blocking materials

Gauge: 1 square will block to 4.5"

HOW TO:

Basic Square instructions.

Start by chaining 4 and joining with a slip stitch

Round 1: Chain 3 (counts as treble), 11 tr into ring. Join with slip stitch (12 Sts)
Round 2:  Chain 3, tr in same stitch, work 2 tr into every stitch. Join with slip stitch (24 Sts)
Round 3: Chain 3, tr in same stitch, tr, *2 tr in next st, tr. Repeat from * for the remainder of round. Join with slip stitch (36 sts)
Round 4: Work as round 3 (54 sts)
Round 5: Chain 3, tr in same stitch, tr in next 2 stitches, *2 tr in next st, tr in next 2 stitches. Repeat from * for the remainder of the round. Join with a slip stitch. (72 sts)
Round 6: Chain 1 (counts as dc), dc, *3htr, 2tr, 1dtr, 2dtr in same stitch, chain 2 (corner made), 2dtr, 1dtr, 2tr, 3htr, 4dc. Repeat from * for remainder of round but ending with 2dc rather than 4dc. Join with slip stitch and fasten off. Weave in ends and block to 4.5"


Using the basic square instructions, make 60 squares in Antique Silver.
Make 20 squares using Golden Nugget for the first round then change to Antique Silver for the remaining 5 rounds
Next make 16 squares using Jade Lapis for the first 2 rounds then swap to Antique Silver.
Using Mighty Spruce, make the first 3 rounds on the next 8 squares then swap to Antique Silver for the last 3 rounds on these squares
Blue Opal is next! Make 4 rounds using this and swap to Antique Silver for the last 2 rounds. You'll need 8 of these square. 
Then finally, make 5 squares using Smoky Diamond for 5 rounds then swap to the Antique Silver for the last round. 

Phew! You'll have 121 squares at the end.

Lay them out as in the photo above and start to join them. I used Antique Silver for joining and the joining method I chose was right sides together and double crochet through the back loops of each stitch. This gives a nice neat finish. For the corner spaces I worked a double crochet into these. It gives a star effect where the corners of the squares meet.

Once you've joined all of your squares, use Jade Lapis to make a border of double crochets. For the corners I worked 2dc,ch,2dc in each. 

Weave in any ends and block.


You now have a lovely blanket to enjoy!


Have fun making this! You can mix it up and choose colour palettes to suit your decor.

I'm hoping to squeeze a post in before the end of the year as I want to share some other bits and pieces I've been making (it's been a really productive year!)

I hope you all have a wonderful Christmas. Take care and stay safe.

Til next time x

15 Dec 2020

Hope

Hi everyone!

Today I'm sharing my Hope blanket.
Named because, quite simply, we all need some Hope in what has been the most extraordinary of years.

Here she is...


Made with Scheepjes Bamboo Soft yarn, I think she sits perfectly on my reading/knitting chair 😊

I've got into the habit of taking my finished projects out and about in the Northumberland countryside to get some beautiful photographs. However, we are currently in a tier 3 area which means I can't.... I'm so disappointed as I could visualise Hope in a dramatic clifftop shot....maybe next year I'll take her out and get some photos.

In the meantime I'll just have to make do with some living room pics whilst battling the rainy December light!!!!


I added a very simple border just to frame the blanket. This a non fussy affair but I love that on point square!


When I threw (yup...my blankets get some abuse!) the blanket on the floor I just loved that you could see the drape of the finished fabric! This yarn is truly gorgeous!


I think this blanket is going to get a lot of use this winter! 

Join me on Thursday when I'll share the free pattern.
Til then x


13 Dec 2020

Progress update

Well hello!
Sorry it's been a bit longer than I planned .... blame COVID 😷
If you don't know already, my real life job is managing a nursing home (I'm a nurse)
The last few weeks have been totally bonkers!
Lateral flow tests (don't even go there!!!), vaccine planning, managing COVID secure visiting.....oh and Christmas planning. My brain is exploding!!!

So what better than to get home, snuggle up and do some hooky?
EXACTLY! Blummin perfect!

On account that when I'm stressed I seem to crochet, knit and sew like a demon....I finished my blanket weeks ago! It just flew off the hook. I'm putting that down to the gorgeous yarn mind you 😉....
So over the next week I'm going to share my progress, grand reveal and pattern in a bumper festival of yarny goodness! Today will be the progress, Tuesday will be the grand reveal (don't get too excited..... tier 3 restrictions have meant that I can't get some lovely out and about photos 😞) and then I'll post the pattern on Thursday.

So let's get on with it shall we?

I'm making the blanket using Scheepjes Bamboo Soft yarn.


Oh my! This yarn is a delight to work with!
It doesn't split and is super soft. The finished fabric has a lovely drape and a subtle lustre.

I decided to make a blanket that consisted of squares joined together as I wanted to play with colour placement. I love a nice simple design so set of sketching out some ideas and ended up with a circle in a square that would increase in size and the placement would form a pattern.


I chose Antique Silver to be the main background yarn with pops of the other rich colours.


This yarn has beautiful stitch definition.


Look at that lustre!


I'm really loving these colours together 😍

Don't they look beautiful?

Here's a sneaky peek at the blanket layout....


I'll share the grand not so grand reveal next time!

Til then x

22 Nov 2020

Are you sitting comfortably?

Good! Let me begin!

Today I want to share some yarn that I’m using for a new project.
I think I mentioned it at the end of my last post.

I love dreaming up a new project. It’s exciting! Letting the idea swirl around in my mind, then working out how I can make it happen. I design in my brain and then swatch it out. Sometimes those swatches get thrown in a bag for another day and other times I go straight ahead and make the project. This is one of those times. I did make a little sketch, just I could work out yarn quantities (that was a fail as I ran out and had to try and source some more quickly as I was on a roll and didn’t want to stop!)

Choosing the yarn was easy. Scheepjes launched a new Bamboo/Cotton yarn last year called Bamboo Soft and having got my hands on a sample I was instantly smitten! 


It is simply one of the most gorgeous cotton blend yarns I have ever worked with!


It's probably in the sport weight/ heavy fingering category. It's a 50/50 blend that it super soft with a lovely lustre. It's also VERY strong! Trust me, you definitely need scissors to cut this! It has a decent twist to it so isn't splitty and once worked up has a delightful drape, even before blocking. 
It's also a vegan yarn. I'm not vegan, nor vegetarian but can appreciate that this can be important to those who are!

It's a Scheepjes white label premium blend yarn and the RRP is £2.99 per ball which I don't think is a premium price at all for the quality of this yarn!
It's currently available in 17 rich jewel like colours including some useful neutrals.

I knew I wanted a neutral main colour for my project so opted for Antique Silver (264) and added in some additional colours...


I just LOVE these colours!!!


I'm making a blanket in what I'm hoping is a simple but striking design.

Join me next time for some progress photos!

Til then x

23 Sept 2020

Making Archie

Hello!

Today it's all about Archie and how to make this cutie.
I'll take you through the making step by step and also give you some ideas on different colour combinations and expressions!


YOU WILL NEED:

 A Main colour: Scheepjes Cotton 8 White (502) x 2 balls 
B Scheepjes Cotton 8 Light Pastel Green (664) x 1 ball 
C Scheepjes Cotton 8 Soft Pink (654) x 1 ball
Black yarn for face (I used some Cotton 8 in Black (515) as I have an impressive stash of this yarn!!!)

3.0mm crochet hook
Tapestry needle for joining and sewing facial expressions
12x12" cushion pad
2 buttons for eyes (make Archie with sewn eyes if you are giving to small child as buttons are a choke hazard and we don't want any choking incidents!)
Blocking materials
Scissors

HOW TO

The body of the cushion is made with star stitch. It's a stitch that give a lovely texture and gives beautiful texture. The star stitch is worked over 2 rows. 

Bella Coco has a really lovely video explaining how to work this stitch and it can be found HERE

Make 2 pieces for front and back.

Using main colour A and 3mm hook, chain 77

Row 1 (RS): Insert hook into 2nd chain from hook, yarn over and pull up loop (2 loops on hook), insert hook into next chain, yarn over and pull up loop (3 loops on hook). Continue until you have 6 loops on hook, yarn over and pull through all 6 loops. Chain 1 to create the 'eye' of the star stitch. To make the next star, insert your hook into the eye, yarn over and pull up loop (2 loops on hook), insert hook between the last 2 spokes of the previous star you've just made, yarn over and pull up loop (3 loops on hook), insert hook into the same chain where you've worked the last spoke of the star stitch, yarn over and pull up loop (4 loops on hook), work into the next 2 chains in the same way and you will now have 6 loops on your hook. Yarn over and pull through all 6 loops. Continue working stitches until you reach the last stitch. Work one half treble in the last stitch. Turn work.
Row 2 (WS): Chain 2 (counts as first half treble), now work 2 half treble crochets into each eye of the star stitches of the previous row. Work 2 half trebles into the last stitch.

The following star stitch works are worked in almost the same way as row 1 except you'll begin each row with a chain 3 and start working into the 2nd chain from hook. 

Continue working star stitch until you have worked 44 rows. 
Join in colour B (do not cut colour A) and work a further 5 star stitch stripes alternating between colour A and B, carrying the yarn up the side of your work.

Fasten off, weave in ends and wet block to 12" x 12"

To make the ears:


Make 2
inc = work 2 double crochets in the same stitch

Using colour C, make a magic ring and work 6 double crochets into the circle. Pull the circle tight. Turn.
Row 1: Chain 1 (counts as dc), inc, dc, inc , dc, inc (9 stitches) turn
Row 2: Chain 1, inc, 2 dc, inc, 2 dc, inc,  dc (12 stitches) turn
Row 3: Chain 1, inc, 3 dc, inc, 3dc, inc, 2 dc (15 stitches) turn
Row 4: Chain 1, inc, 4 dc, inc, 4 dc. inc, 3dc (18 stitches) turn 
Row 5: Chain 1, inc, 5 dc, inc, 5dc, inc, 4 dc (21 stitches) turn
Row 6: Chain 1, inc, 6dc, inc, 6dc, inc, 5 dc (24 stitches) turn
Row 7: Chain 1, inc, 7 dc, inc, 7 dc, inc, 6 dc (27 stitches) turn
Row 8: Chain 1, inc, 8 dc, inc, 8 dc, inc, 7 dc (30 stitches) turn
Break colour C, join colour A
Row 9: Chain 1, inc, 9 dc, inc, 9 dc, inc, 8 dc (33 stitches) turn
Row 10: Chain 1, inc, 10dc, inc, 10dc, inc, 9 dc (36 stitches) turn
Row 11: Chain 1, inc, 11 dc, inc, 11 dc, inc, 10 dc (39 stitches) turn
Row 12: Chain 1, inc, 12 dc, inc, 12 dc, inc, 11 dc (42 stitches). Fasten off and weave in ends. 

THE FACE!

This is where you can have some fun!
It is really amazing how slightly altering an eye can change the whole expression of a face!

I embroidered Archies nose and mouth using back stitch and satin stitch for his nose. I just lightly used a pencil to sketch out the face but you could use any kind of disappearing pen (the kind used in embroidery)
His eyes on my version are buttons and eyebrows are a simple straight stitch. 

Add the face before you join the pieces together - so much easier than trying to wrestle with a cushion!!

Below are some simple faces showing how slightly altering lines can change the face. 


To join together, blanket stitch the front and back around 3 sides together using yarn A leaving the bottom edge open so you can insert the cushion pad. 
Next attach the ears with an over stitch, positioning the ears at a slight angle. 
Insert your cushion pad and blanket stitch the bottom opening. 

TAaaaDAaaaa!!!! 
Your cushion/Archie Bear is finished. 


Why not make a brown bear with a navy and white striped jumper?
He could be Archies French cousin Pierre!!!!!

Have fun, I hope you enjoy making Archie and pals!

Til next time when I have some new yarn to share.... x

16 Sept 2020

Meet Archie.......

I think he's a bit cute...


Made from Scheepjes Cotton 8 100% cotton yarn, he's a quick and affordable make.
Perfect for a "Welcome Baby" gift.... or a "just because" present. 

Hook him up with different colours and you've got a Teddy that any child would love. 


I had really good fun making him.
Playing with expressions.... it's amazing how slightly altering an eyebrow gives a completely different look. But more on that next week when I'll share how to make this cutie! Promise it's not too tricky!


Join me next time for some Archie making goodness!

Til then x

9 Sept 2020

Progress.... but on what??!!!

Well hello!
Thought I'd drop by and share some progress photos...
If you remember, I'm making something with Scheepjes Cotton 8
One of my top favourite yarns. 
I think I gushed enough in the last post so I'll not repeat myself!

Oh I'm really loving this make. It's something quite different for me.
In fact, it's very different.
This year, I'm trying to stretch out of my comfort zone in many ways.
Trying new colour combinations, new styles, new crafts...all manner of new things. 
It's easy to get stuck in a rut I think.


So here we are. What is it? .....well......


It has 2 main pieces....


Made from star stitch (love the texture this stitch gives!)....


2 wash cloths? 
Nope.....
I think I'll leave you guessing until next week!
Mean huh?!!!!
Yup...very mean!
But it'll be worth it....
Prepare for cuteness overload....

Til next time 😉

1 Sept 2020

An old love.....

Well hello dear readers! It's been a while. A blummin long while.....
I'm not exactly sure where the last 6 months have gone. I blame COVID-19.
I blame COVID on a lot of things. An awful lot of things!
These 6 months have been truly horrible. One day I'll fill you in on the gory details, but for now, I think some yummy yarn is in order!

I may have been absent on social media of late but crikey my hands have been busy whipping up all manner of goodies!
Today I thought I'd share the yarn for a project that will have a free pattern. I like sharing free stuff. It's what makes me happy. 

This project was thought up when I saw some unbelievably cute images on Etsy. Well, straight away my mind went into overdrive.... Hmmmm...I could make something lovely along those lines....what if I did it like this.....let me just have a quick practice. Voila! That's how my mind works.
It usually leads me onto lots more ideas....it's a rabbit hole!!!!

Ok enough waffling. 
Let me share the yarn and the colours I've chosen.


Cotton 8 was the first Scheepjes yarn I fell in love with. It's still up there in my top 3. 
It's not mercerised. The more it gets handled, the softer it gets. It's available in a HUGE (48!) range of colours. It comes in 50g balls and you get a whopping 170m of 100% Cotton yarn. It's a fingering weight that, when blocked, has a beautiful drape to the finished fabric. And best of all, it's a very affordable yarn at £1.99 per ball. 


I don't think I'll ever tire of this yarn. I've made soooo many projects with it and they're all still going strong!


You can see that it's machine washable at 40 degrees. I know it says don't tumble dry... but I've made lots of dish cloths with it that have gone through a 60 degree wash and been tumbled..... but shhh..... don't tell!

For my project I've chosen 4 colours.... well 2 main colours and scraps of the others (I have a significant Cotton 8 stash....dating back to over 10 years ago!). Join me next week and I'll share some progress photos with you. 

Hint, hint.... this would be perfect for gift making.... in plenty time for C.......... (the word not to be uttered until at least October!!!!)

Til then x

28 Oct 2019

Autumn Jewels Free Pattern

Hello and welcome!
As promised, tonight I'm going to share the free pattern for my Autumn Jewels blanket


The blanket was made using Scheepjes Our Tribe yarn and is beginner friendly. The only tricky bits are joining as you go but I've found a lovely You Tube tutorial that should guide you through! I haven't written a step by step tutorial for this pattern as time has sadly been on my side lately....where on earth do these hours go???!!!! 

Ok, ready to make a blanket????
Let's go!

Ingredients

Scheepjes Our Tribe (70% Merino Superwash, 30% Polyamide, 100g/420m)
Yarn A: 984 Old Bewick x 6 balls
Yarn B: 987 Excitement x 1 ball
Yarn C: 989 Optimism x 1 ball
Yarn D: 986 Energise x 1 ball

Size 3mm crochet hook
Scissors
Needle to weave in ends
Blocking materials

Gauge/Tension

Each square will measure 3" after blocking
Finished blanket size after blocking: 44" (112cm) x 56" (142cm)

There are no special stitches in the pattern and it is written in UK crochet terms.

Before we start I just want to say a few things about this yarn. Because it is a single ply construction it may have areas where the yarn is slightly irregular. It isn't a fault, just the nature of the yarn! So if you get some thinner or thicker bits just embrace it, smile, and carry on! This is also what I call "sticky" yarn!!! If you make a mistake and need to rip back a bit be gentle.... slow and careful easing apart is much more successful with this yarn than firmly pulling.

How To

With either Yarn B, C, or D ch4, join with ss to 4th ch from hook
Round 1 Ch4 (counts as tr and ch), into ring (tr, ch1) 11 times, join with ss to 3rd chef first st. [12sts, 12 ch-sps]
Round 2 Ch3 (counts as tr), tr in same st, ch1, (2tr in next st, ch1) rep 10 more times, join with ss to 3rd chain of first st. [24sts, 12 ch-sps]
Round 3 Ss into next st, ss into ch-sp. ch3 (counts as tr), 2tr into ch-sp, ch1, (3tr into next ch-sp, ch1) rep 10 more times, join with ss to 3rd ch of first st, fasten off yarn. [36sts, 12 ch-sps]
Round 4 With yarn A join in any ch-sp and dc, ch3, dc into next ch-sp, ch3, dc into next ch-sp, ch5 (corner), rep 3 more times, join with ss to first dc. [12 dc, 8 3-chs, 4 5-chs]
Round 5 Ss into ch-sp, ch2 (counts as htr), 3htr in same ch-sp, ch1, 4htr in next ch-sp, ch1, (3tr, ch3, 3tr) in corner 5ch-sp. Rep working 4htr in 3ch-sps and (3tr, ch3, 3tr) in corner ch-sps working a ch between each group of sts, join with ss to second chain on first st, fasten off. Weave in ends.

Block squares to 3". You will need to make 154 squares in total using Yarns B, C and D.

Just in case you were undecided whether to block or not...


Just look at the difference blocking makes to this yarn!!!

Joining

Lay your blocked squares out on the floor until you are happy with the placement - 11 squares wide and 14 squares long. I opted to go random! I just picked up squares and placed them. Then I took a photograph and changed it to greyscale so I could check that there was an even distribution of light and dark values....I actually only ended up swapping a couple of squares! 

Using a join as you go technique for granny squares, join the motifs together. Bella Coco has a fabulous You Tube tutorial on this technique HERE.
It looks way more tricky than it actually is and once you get the hang of it you'll be done in no time and ready for the border. 

*If you really don't want to join as you go, you can simply add another round of 3tr into ch-sps and (3tr, ch3, 3tr) into the corners to the squares and join with your favourite joining technique*

Border


Round 1 Using Yarn A, join in first st of any side, ch3 (counts as tr) and work a tr into every st. Corners are made by working (3tr, ch3, 3tr) into the corner ch-sps, join with a ss to 3rd ch of first st. 
Round 2 Ch4 (counts as tr and 1ch), sk st, *tr, ch1, sk st rep from * to corner. Work (tr, ch3, tr) in each corner (ensure you begin each side with a tr), join with ss to 3rd ch on first st.
Round 3 Ch3 (counts as tr), work tr in every st and ch-sp along sides and work (2tr, ch3, 2tr) into corners. Join with ss to 3rd ch of first st.
Round 4 Ch1, dc into same st, ch5, sk 2 sts, dc, ch 5, sk 2 sts. rep to corner aiming to work a dc on the last st of each edge and beginning of next edge so that you have a ch 5 over each corner. You may have to fudge this a little depending on your st count! Join with ss to first dc. 
Round 5 Ss into ch-sp, ch 3 (counts as tr) 2tr, ch2, 3tr.  Continue to work (3tr, ch2, 3tr) into each ch-sp around the blanket, join with ss to 3rd ch of first st. Fasten off and weave in ends.

Now block your blanket! This yarn really responds well to blocking and it gives great stitch definition and a beautiful drape!!!

I hope you enjoy making your version of Autumn Jewels! 
And as promised, here's the photo of the lichen clad stone on Old Bewick that inspired this colour way...


I'll leave with some more blanket pics.....


Til next time.... I have a new project in the making!!!! x

21 Oct 2019

Introducing Autumn Jewels Blanket

Hello everyone!
I've got a blanket reveal to share with you...
It even has a name.
I prefer to see the finished article before naming a project

So if you remember from my last couple of blog posts (HERE and HERE), I decided on Scheepjes Our Tribe yarn to make my blanket. 
There were couple of reasons for this...it's stunning yarn and also I wanted to showcase the Old Bewick colour way as I chose the colours!!! I was inspired by lichen on a stone and was completely mesmerised by the array of yellows and lime greens. I'll share a photo of the stone next time as I want this post to be full of finished blanket wonderness!!!!

So here it is.....


Autumn Jewels.

I found some great locations to take the photos. This one is at Gs workshop. He's an artist blacksmith (and hedge layer!) and has his workshop in a converted steading on a country estate just outside Kelso. The peeling painted door was a perfect backdrop!


I love how the yellow pops against the paintwork... but not content with a couple of photos we ventured on in search of more locations....


As we were out and about the light kept changing.... and likewise so did the yellows!
Depending on the lighting this blanket changes from golden to more lime coloured, but the jewel like centres stay true. 


I love the colours against the changing autumn leaves and the stone. 


Gotta love some blowing in the wind....


action shots....


it was VERY windy!


We found a delightful Church in Stitchill to take the final shots....


How's this for a perfectly positioned gate? Just blanket hanging ready!!!


I'll leave you with this close up of the simple but effect border.... this blanket is very much a beginner friendly project. Next week I'll share the FREE PATTERN! 

I hope you all like my Autumn Jewels blanket. I think it's one of my favourites!

Til next time x


TEMPLATE DESIGNED BY PRETTYWILDTHINGS